Create an Active Work Instruction
A work instruction (also referred to as work guide, job aid, or standard operating procedure) is documentation that describes to shop floor personnel how a part or assembly should be built, often using both text-based instructions and visual aids such as diagrams, videos, documents/specifications, and/or photos.
In FactoryLogix, an Active Work Instruction is an interactive document that can include color-coded parts lists or BOM blocks (detailed parts list), smart text, graphics, callouts, and video. Shop floor personnel use Active Work Instructions to complete specific tasks in a manufacturing process.
In electronics manufacturing, an Active Work Instruction is typically used with PCB CAD data to produce a color-coded document where each part on a PCB is colored by part number and presented graphically with a color-coded parts list called a BOM block.
The following example uses CAD data to create an Active Work Instruction.
Log into the NPI client application.
Select Process Engineering
 > then double-click a product or assembly under Define Processes.
In the Process tree, double-click an operation to check it out for editing.
To add an Active Work Instruction, select the Add
 button on the Document Tools toolbar in the Active Work Instructions area.
 On the Visual Aid Tools tab, select Insert > Insert ECAD.
In the Select ECAD Layers dialog, select the layers you want to display for the PCB, then select OK.
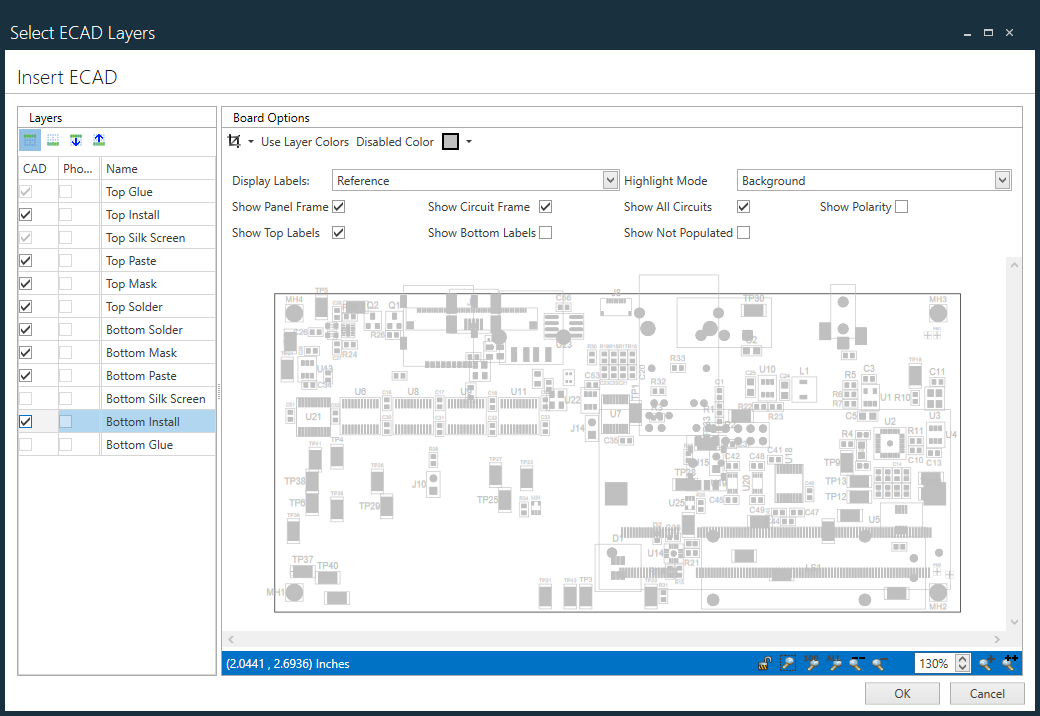
On the Visual Aid Tools tab, you can now see a graphical representation of the PCB as imported from the CAD data.(Optional) Drag to resize or reposition the PCB for the Active Work Instruction.
Select Insert > Insert BOM Block, then select OK to accept the default BOM block settings.
Resize and reposition the BOM block as needed.
Double-click the step to open the Settings dialog, then select the Activity Splitting tab.
Select Max Items per Activity, change the number to 7 , then select OK.
Notice now that a number of Basic Instruction activities were added to the step automatically. The number of activities added depends on the total number of parts assigned to this operation divided by the Max Items per Activity setting.Select the first activity in the list, then select the Visual Aid Tools tab.
(Optional) You can annotate and mark up each activity without affecting the other activities in this step.
If the step document is modified, these changes are reflected in each and every activity document with the step (this is known as the overlay concept).(Optional) Add more steps and activities.
When you are satisfied with the documentation, select Save, then select Close above Step List to commit the changes to the database.
The Active Work Instruction created at the step level is inherited by each activity. The color-coding options of the Color-Coded step are reflected in the activity.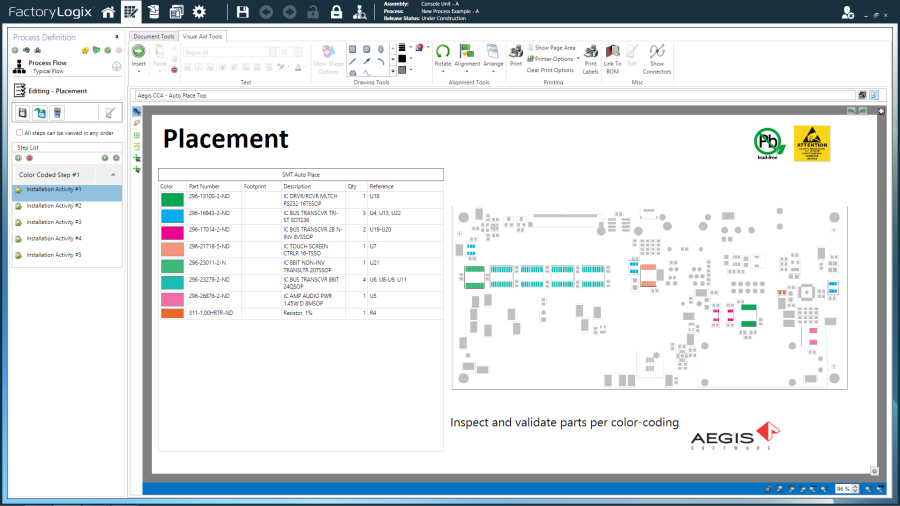
Related topics |
|---|