Approvals and sign-off
FactoryLogix includes a sign-off and approval system that can send automated emails to members of sign-off groups to request approval of one or more areas of an overall process. Members of sign-off groups review the requisite areas and approve or reject based on their findings.
You can add approval processes to one or more of the approval points in FactoryLogix shown in the following table.
Approval point | Description |
|---|---|
BOM | The Bill of Materials (BOM) |
CAD | The ECAD or Electronic PCB design data |
Process Flow | The operational process steps an assembly must follow |
Operation | Each individual step in a process flow |
Activity Completion | Used on the factory floor to acknowledge that an operator completed a specific activity in a manufacturing process definition |
Batch | The manufacturing order including build quantity and revision to build |
Process | The overall manufacturing process definition |
Change Notice | Manufacturing change notices |
Just-In-Time Reroute Process Flow | The process flow defined for Just-In-Time reroutes |
Non-Conformance | A documented non-conformance |
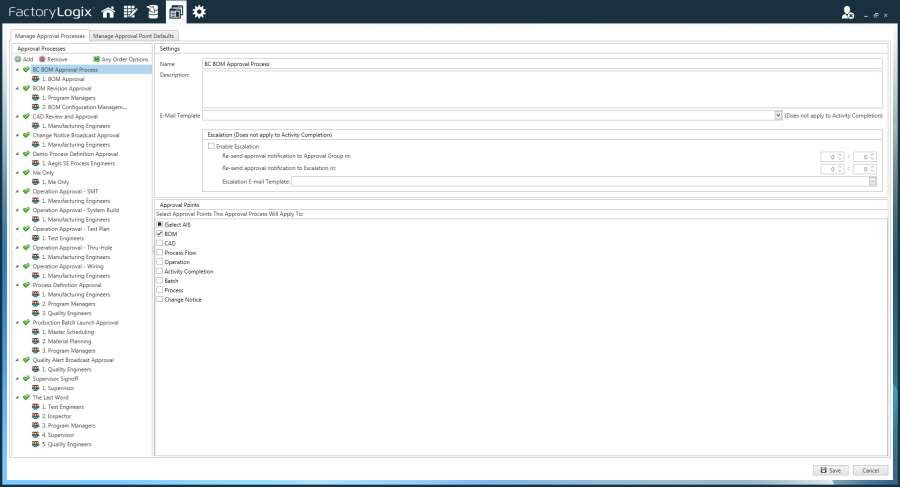
Add a new approval process
Log into the NPI client application.
Select Templates and Standards
 > Define Approval Processes.
 On the Manage Approval Processes tab, select Add
 > Add New Approval Process.
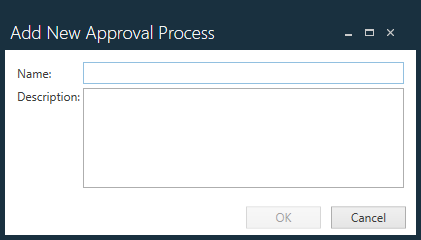
Enter a Name for the new approval process, then select OK.
Select the new approval process in the tree to open the settings pane to the right.
Select an approval E-Mail Template from the drop-down.
Note
See Create an E-Mail template for details about creating email approval templates.
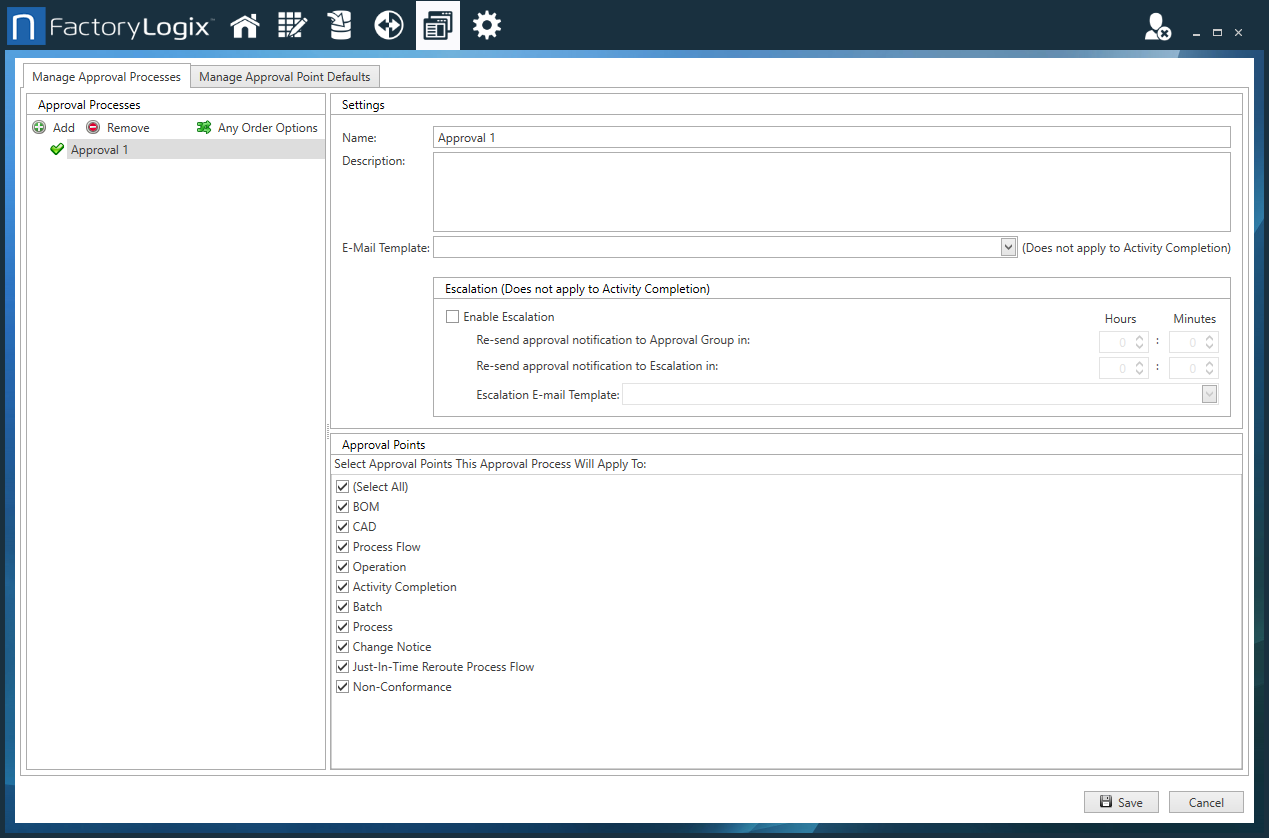
If you want the approval process to use escalation, select the Enable Escalation check box, then select an escalation email template to use from the Escalation E-Mail Template drop-down.
Use the Hours and Minutes options to specify how long after the original approval email notification is sent to send a second email to the approval group and the time period before an escalation email notification is sent.
Select one or more Approval Points, then select Save in the lower-right corner of the window to save your changes.
Add user groups to an approval process
Administrators can add one or more user groups to an approval process. (User groups are created in the Users and Roles area of NPI System Configuration. See Create and manage users and groups for more information.)
If you add more than one user group to the approval process, one member from each of the designated sign-off user groups must approve the specified approval point—in sequential order. Once a member from the first sign-off group approves the item, a member from the second group may sign-off and approve the approval item.
You can also designate two or more user groups as any-order groups (approvals may occur in any order, not just the order in which they appear in the approval point).
Log into the NPI client application.
Select Templates and Standards
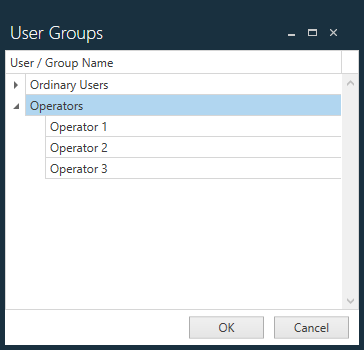
> Define Approval Processes. Select an approval process in the tree, then select Add
> Add Existing User Group.Select the desired user group from the list for the selected approval process, then select OK.
Repeat Step 4 to add more user groups to the approval process.
To create an any-order approval group, select the first group to be added, then Ctrl+click the second and subsequent user groups to multi-select from the tree. When all user groups are selected, select Create Any Order Approval Group.
Manage approval point default settings
Each item type that requires an approval process may have one specific approval process designated as the default. Once set as the default, the specified approval process is applied automatically each time that item is created in FactoryLogix.
Log into the NPI client application.
Select Templates and Standards
> Define Approval Processes. To specify a particular approval default, select the Manage Approval Point Defaults tab.
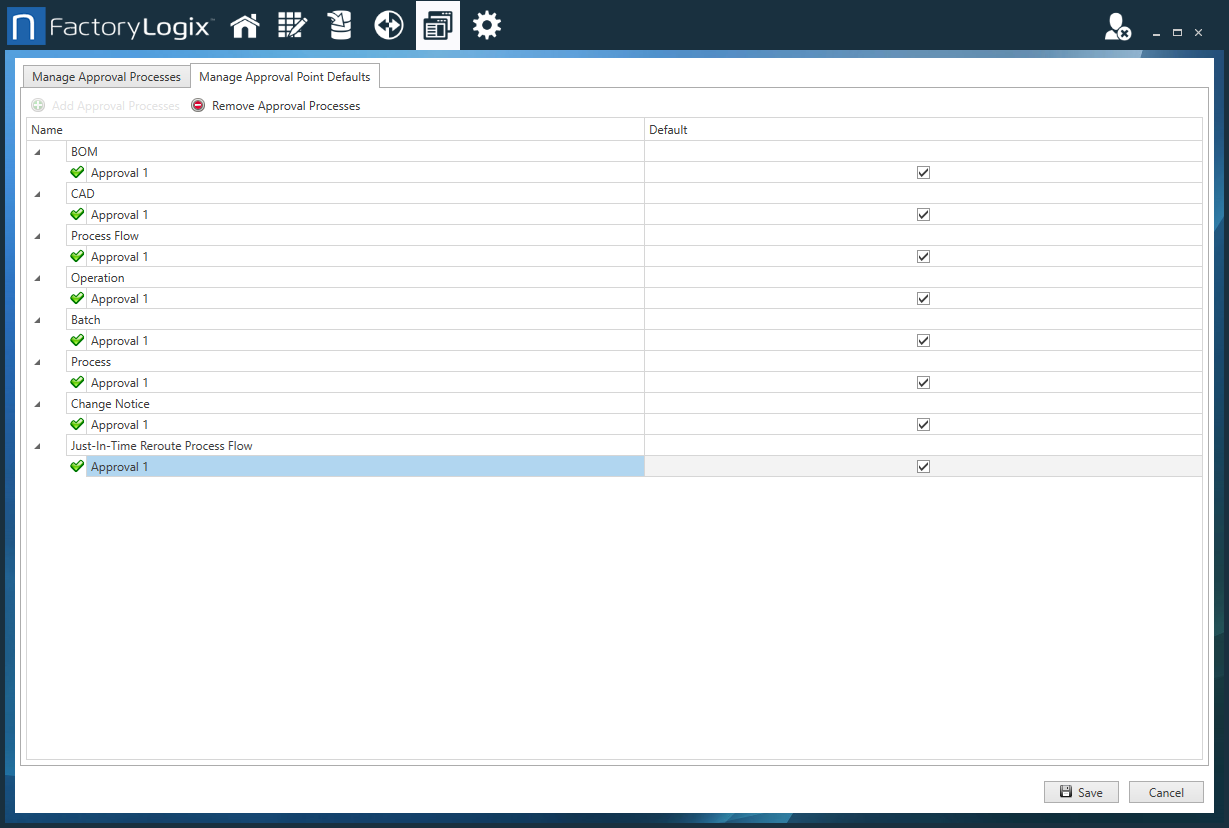
Each approval point is listed along with the assigned approval groups.Select a check box to make an approval point the default.
Select Save in the lower-right corner of the window.
The selected default Approval Point Defaults will now be applied each time a new item of that type is created.
Assign an approval process
When work is completed on a particular process item, you can initiate the approval process for that item.
Log into the NPI client application.
Select Process Engineering
 > Define Processes, then double-click a product or assembly to open it.
Select the top-most node of the Process tree. The Process Release Status is displayed in the upper-right corner of the window. (Before you release a process to Production, the status is Under Construction.)
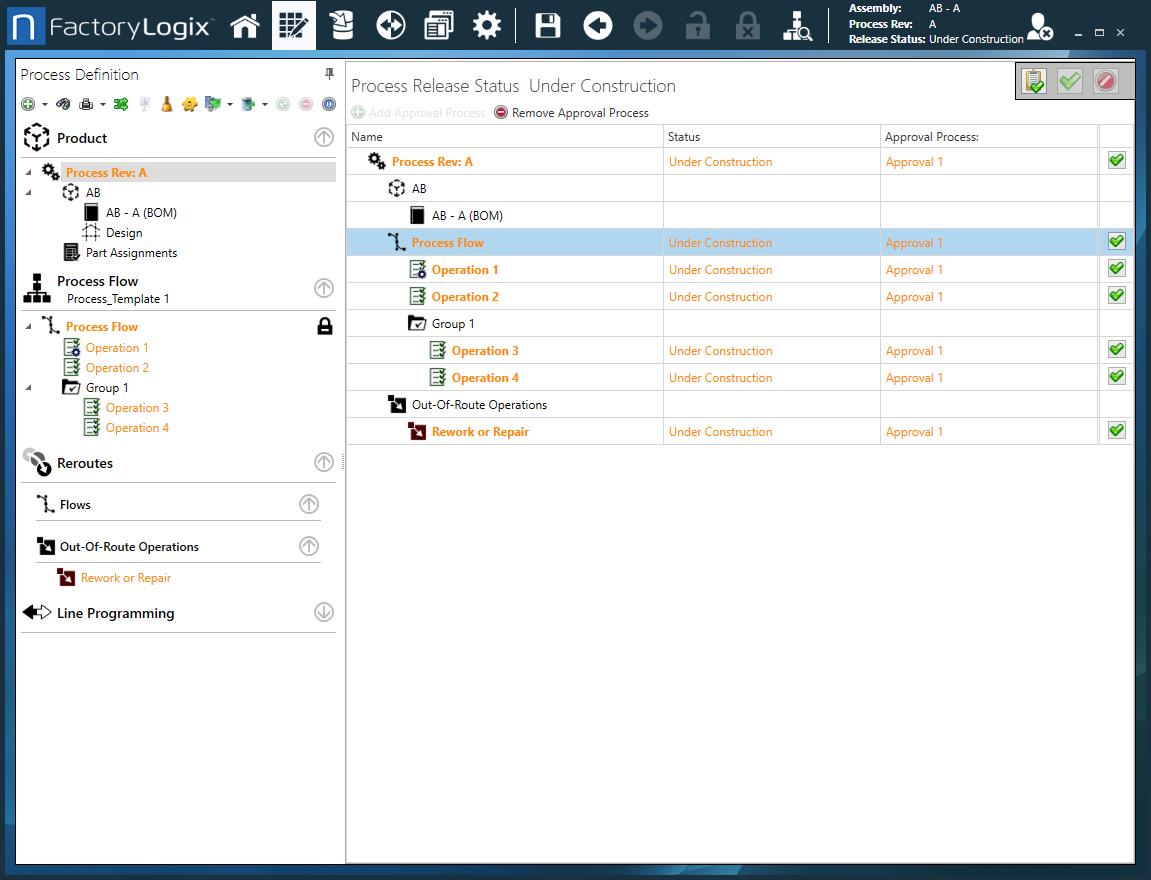
If no default approval processes are defined, you can add an approval process manually to one or more process items. For example, select the BOM item in the list to the right and select the Add Approval Process button.
Select the desired approval process from the list, then select OK.
After an approval process is assigned to an item, that node of the tree changes color to indicate the state of approval: Orange means the item is still under construction. Blue indicates that the approval process was initiated and is pending sign-off. Green indicates that the item has been signed-off and approved.
Set up an email address for approvals
Initiating an approval process sends emails to the members of the specified sign-off group using the E-Mail template specified in the approval process.
In the NPI client application, select System Configuration > Settings > Global Options > E-Mail.
Specify the SMTP Server setting defines the email server to be used for sending emails.
Enter an E-Mail Address (the email address from which the approval emails are sent to approvers).
When the email settings are configured, select Save.
Note
For instructions to create E-Mail templates for approvals, see Create an email template.
Initiate an approval process
In the Process Definition window, select the Green check mark to the right of each approval or select the Initiate All for Approval button in the upper-right corner of the window to change all applied approval processes to a state of Pending Approval (Blue).
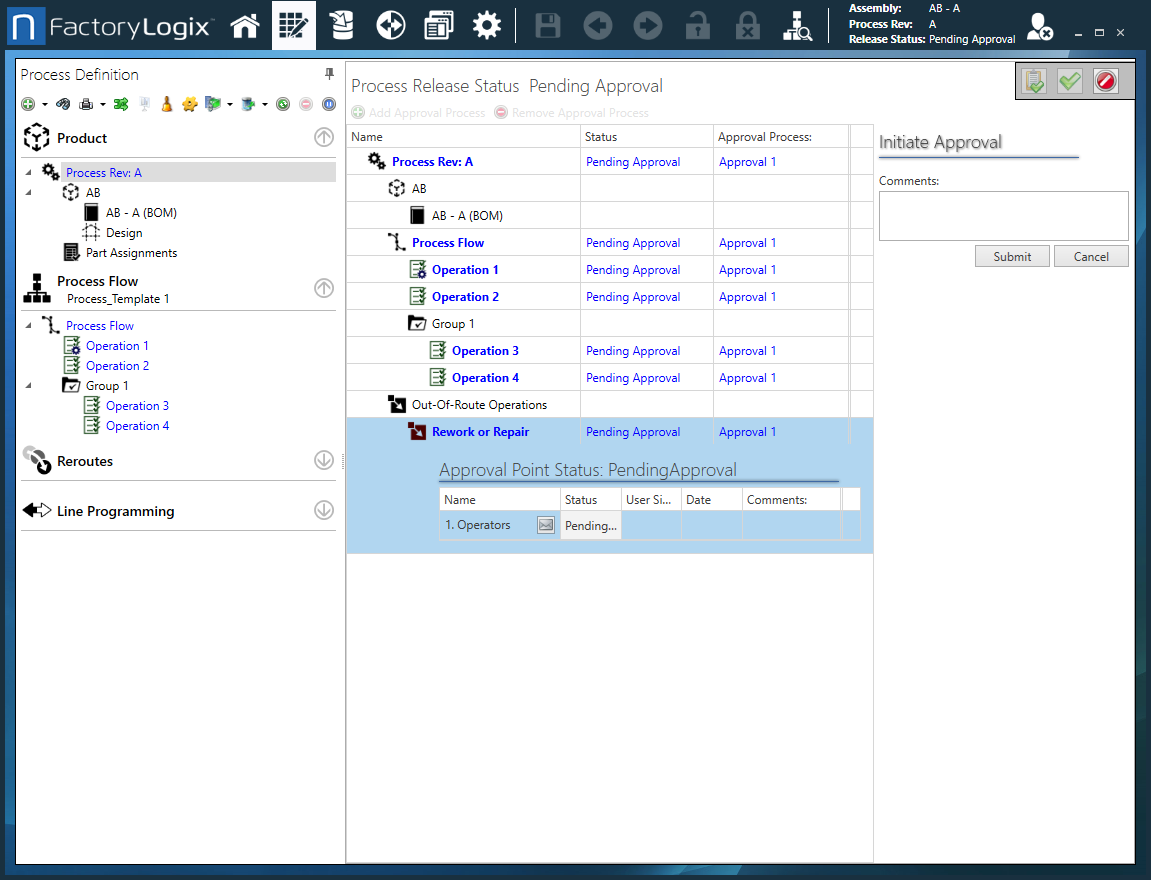
(Approvers) When you receive an email notification that approval is required for an item, log into the NPI client application and open the specified process revision.
(Approvers) Review the appropriate areas of the overall process and approve or reject as necessary.
(Approvers) Enter comments about the approval or rejection (optional).
To approve an item, select the approval item in the list on the right.
(Approvers) If you signed into NPI with a username associated to one of the sign-off groups listed, select the Change Status button to the right of the sign-off group name.
(Approvers) Select the Green check mark to approve the revision or item, select the Red X to reject the item.
(Approvers) Select OK to commit the approval or rejection.
Related topics |
|---|