Create a box and add it to inventory
You enable the packout system by creating boxes in the Containers area of the NPI client application. You define a box, assign a Unique Identifier (UID) to it, then add it to your inventory. If you use the same box for different packing lists or products, you can quickly create specific instances of the same box, each with a different UID or barcode and add those to your inventory. After you create boxes, you add a packout step to a process definition; the boxes are then utilized in production.
Log into the NPI client application.
Select Logistics
 > Containers to display the Containers window.
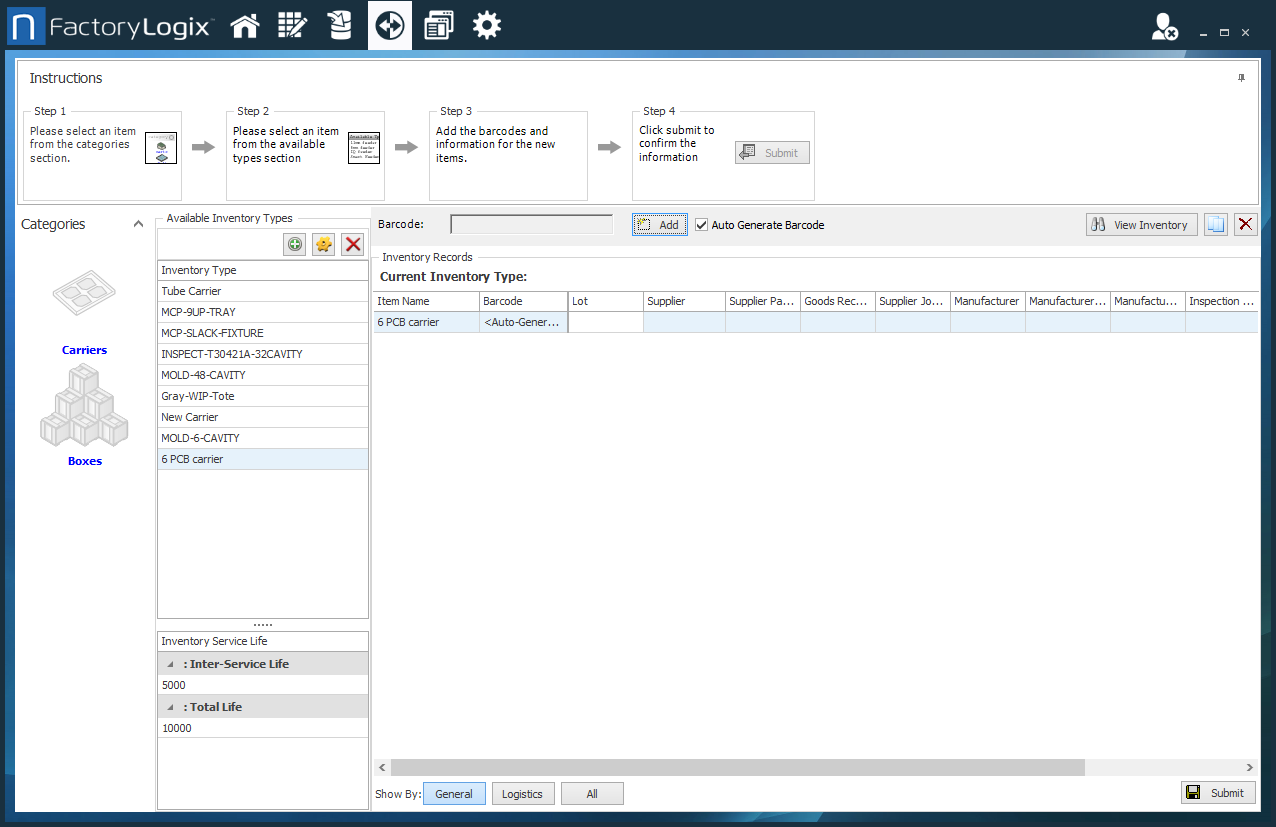
Select Boxes on the left side of the window (select either the word or the image).
To add a new box for example, select the Add button on the left side of the window.
Enter a Name for the box.
The name can be the box dimensions (for example 48 in. x 48 in x 24 in.), the name of the items the box was designed to hold, or another name of your choice.
Enter a number for Max Capacity to define how many items the box can hold when fully packed.
Select OK.
Use the Barcode field to enter or scan a barcode for this box or select the Auto Generate Barcode check box to create UIDs automatically.
Select the Add button to add the box as an inventory type, then select the Submit button in the lower-right corner of the window to add the box to the database.
When you see the confirmation message, select Close.

To add specific instances of the box, each with a UID or barcode, select the box you created, then select the Add button (once or multiple times if you want to create more than one box).
Select the Submit button in the lower-right corner of the window to create the new instance(s) of the box.
Each time you select Submit, a new box of the selected type is created and a UID is generated.For each instance of a box in inventory, use the fields on the right side of the window to add details such as Lot, Supplier, Supplier Part Number, Goods Receipt ID and so on.
Select the View Inventory button on the right side of the window to view the boxes in inventory.
Select any field and enter details for a box in inventory such as Quantity, Vendor, and so on.
When you finish making changes, select OK to return to the Containers window.
Note
As long as you are not tracking the Lot, Supplier, Supplier Part Number, Goods Receipt ID, and so on of the box, you can generate UIDs automatically in Production using the Generate button in the Packout operation.
Related topics |
|---|