Operation-based recipe management (the default mode) allows you to manage recipes on an operation-by-operation basis. A recipe is stored with each operation.
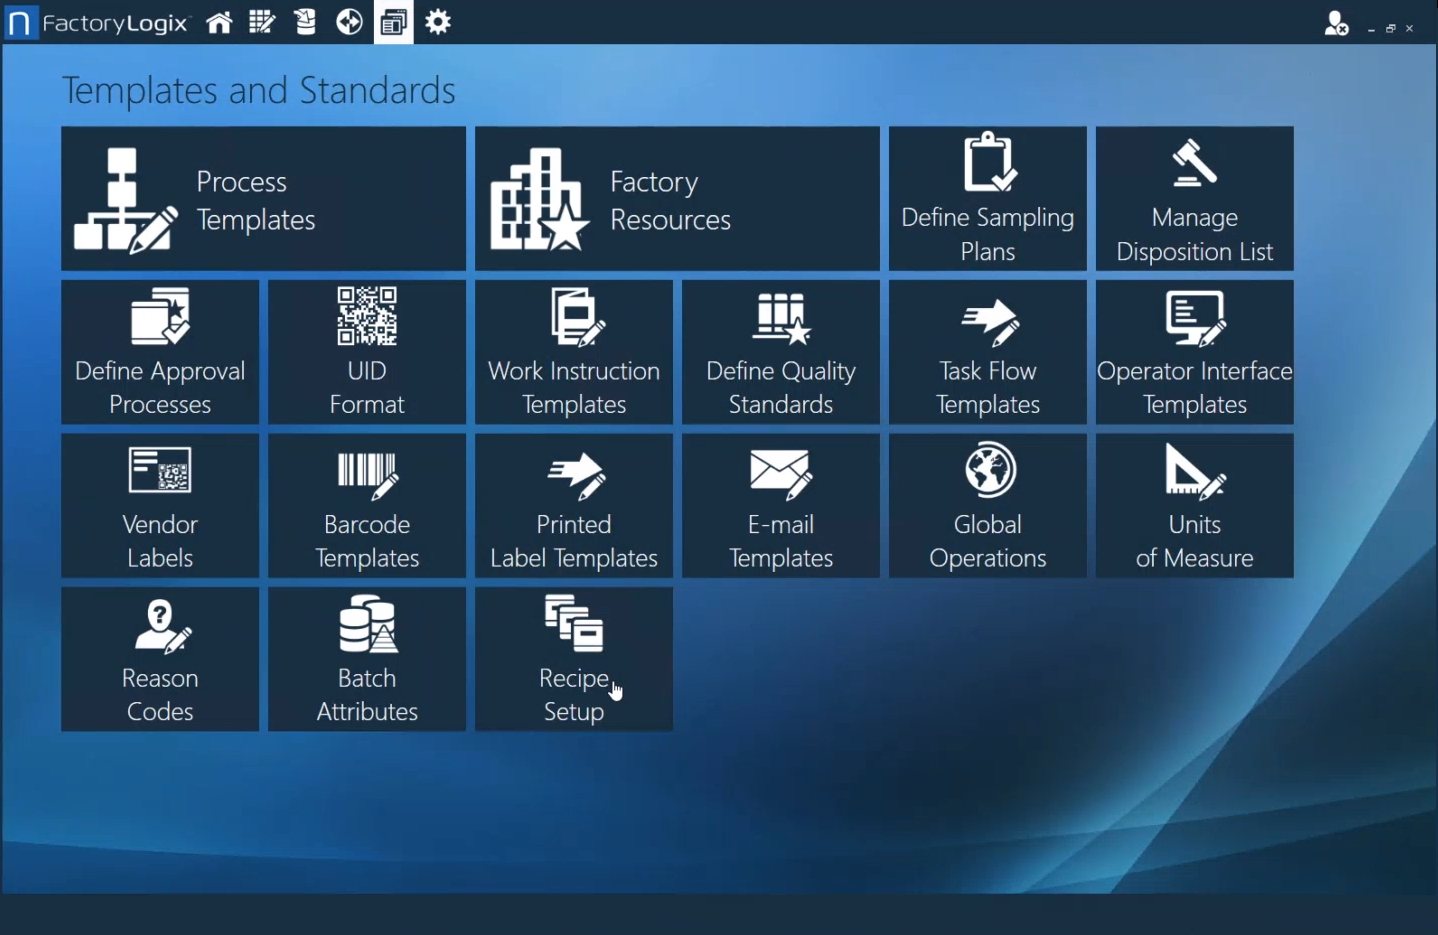
After selecting the Operation option for recipe management in the NPI System Configuration > Settings window, you'll see a new button named Recipe Setup in the NPI Templates and Standards window (next to the Batch Attributes button), as shown in the following illustration. Use the Recipe Setup button to access the operation-based recipe management features in NPI.
Note
If you see a Recipe Management button instead of Recipe Setup, the system is set up to run with global recipe management, these operation-based recipe management instructions do not apply.
After selecting the Recipe Setup button, you see a new window. Here you define the parameters that make up a recipe (specific values and settings are defined later in the related operation in the NPI Process Definition window). The visual aid Insert Recipe Information is used to display recipe details and values to operators during Production.
There are two tabs for setting up recipe data:
Recipe Types - Defines the set of parameters and/or files for each recipe.
Using a reflow oven example, the Recipe Type Multi-Zone Oven defines Temperature Zone 1, Temperature Zone 2, Temperature Zone 3, Temperature Zone 4, Temperature Zone 5, Temperature Zone 6, Temperature Zone 7, Temperature Zone 8, and Conveyor Speed.
Selection Types - Identifies how the recipe is selected (by factory resource location/resource type or by batch attribute value(s)), defines settings outside the recipe, and specifies the related recipe type(s) used.
Using the reflow oven example, the selection type Reflow is used by oven workstations defined in FactoryLogix Factory Resources, and includes an option to specify the selected Chemistry (Pb, Lead Free, No Clean), the number of Layers (7), the Location, and specifies use of the recipe Multi-Zone Oven.
FactoryLogix uses the Recipe Types and Selection Types information you specify to select and apply the correct recipe to an operation in Production.
Define a selection profile
The Selection Types tab is where you configure the selection profile for an operation-based recipe. FactoryLogix uses the selection profile combined with the recipe type to filter data and ensure the correct recipe will be selected for an operation in Production.
Select the Green Add button under Selection Types on the Selection Types tab to create a selection type.
In the Add New Selection Type dialog, enter a Name describing the nature of the selection type, then select OK.
Under Field Setup, select the Green Add button to display the Add Column dialog where you create the Selection Type column content (the criteria to be used for the recipe).
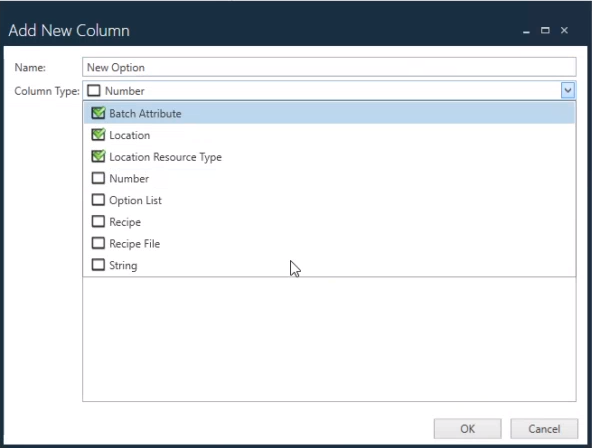
The Column Type drop-down in the Add New Column dialog represents the types of values (also known as data types) that will be used by FactoryLogix to ensure the correct recipe will be selected for an operation.
The primary options used to define the selection profile column types are Batch Attribute, Location, and Location Resource Type. One or more of the Green check mark Column Types must be included for each Selection Type you create:
Batch Attribute – where its value is related and defined in a given batch, and oneof the following:
Location – where specific Factory Resources workstations are specified when called out in an operation’s recipe.
Location Resource Type – where Factory Resources workstations are dynamically related to the Resource Type called out in the operation’s recipe.
Important
You may only select a Location or a Location Resource Type for a selection profile—you cannot select both.
Example: You have nine SMT machines and want all except one machine to use the same recipe. In this case, you would select Location Resource Type for eight machines, then select Location or a different Location Resource Type for the ninth machine that will use a different recipe.
The remaining Column Type selections allow you to specify these additional data types and add them to the selection profile.
Number - Specifies a numeric value. Using the reflow oven example, the number specifies the number of layers in the circuit board.
Option List - Displays a list of selectable options for this profile. Using the oven example, the options can specify the supported chemistries: Pb, Lead Free, and No Clean.
Recipe - Identifies the name of the recipe that will link to this selection profile. (You define recipes on the Recipe Types tab.) Using the reflow oven example, the recipe is named Multi-Zone Oven.
Recipe File - Specifies a recipe program file for this selection profile. You can link to the file or select the Store file in the database check box to save the file in the FactoryLogix database.
String - Specifies any alphanumeric value, label, or description.
Any column with a Green check mark next to its name will be used to select a recipe.
Using the reflow oven example, the selection type named Reflow is used by oven workstations defined in FactoryLogix Factory Resources. You will also specify the selected Chemistry (Pb, Lead Free, No Clean), the Number ofLayers, the Location, and use of the recipe Multi-Zone Oven in the Field Setup area of the window.
Select a desired Column Type.
Specify the Name of the column in the Name field, then select OK.
Continue making Column Type selections.
When you are finished select the Save button in the lower-right corner of the window.
Recipe Types tab
The Recipe Types tab is where you specify which recipe values will be recorded by FactoryLogix.
Each column name will display on the Recipe Types tab in the Field column. FactoryLogix will associate the columns for each recipe you define with the appropriate values and display those values to operators during production using the visual aid type Insert Recipe Information.
Select the Green Add button under Field Setup to add the fields.
Using the reflow oven example, the Recipe Type Multi-Zone Oven defines Temperature Zone 1, Temperature Zone 2, Temperature Zone 4, Temperature Zone 5, Temperature Zone 6, Temperature Zone 7, Temperature Zone 8, and Conveyor Speed.
When you're finished adding fields, select the Save button in the lower-right corner of the window.
Make recipe selections in operations in the build process
After defining selection types and recipe types in the Recipe Setup area of NPI, you can specify the recipe information operators will see for an operation in the Process Definition window.
In the NPI Process Definition window, open the operation you want to apply a recipe to.
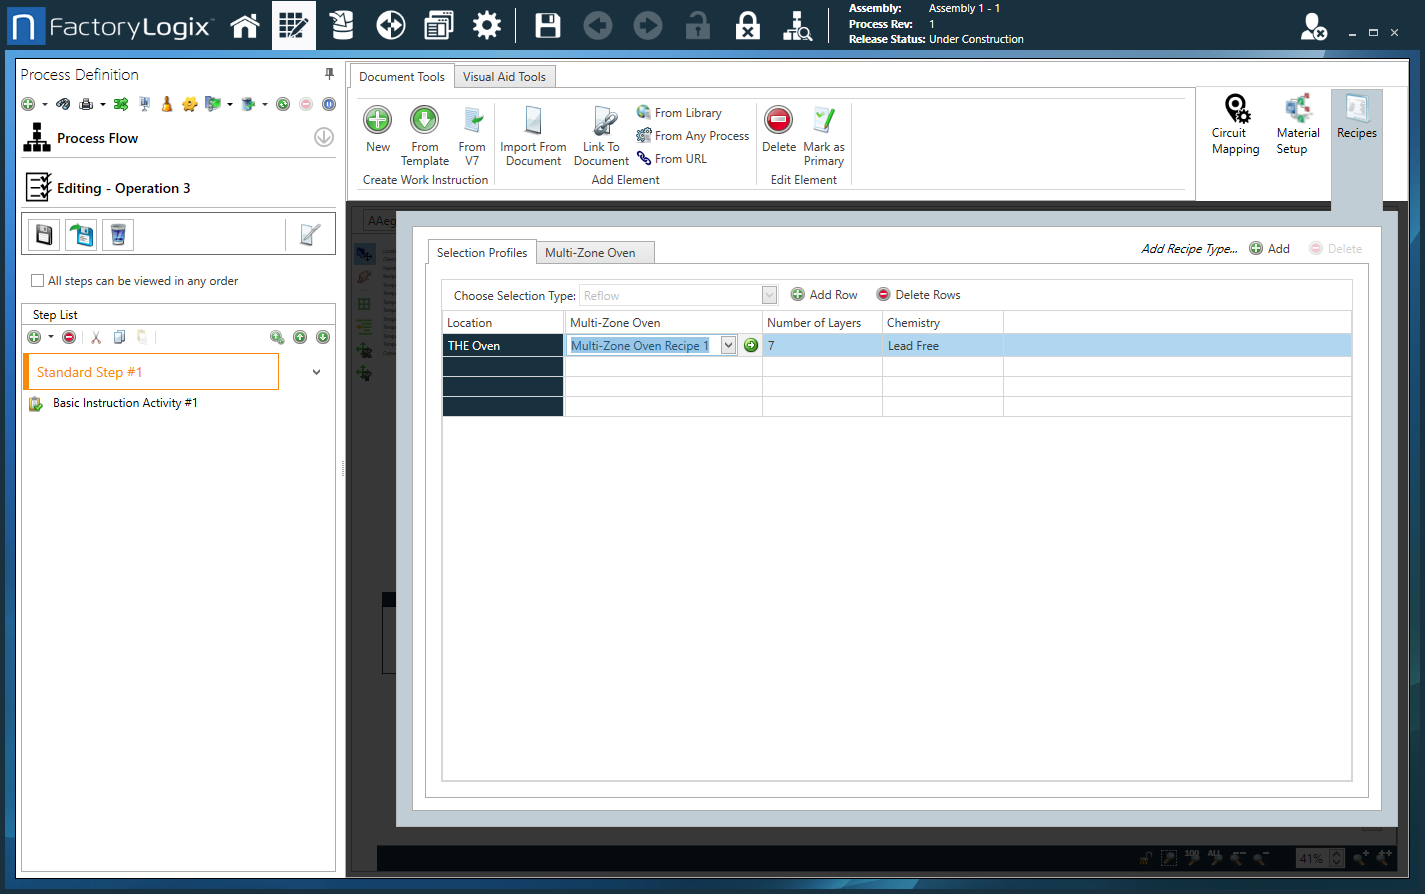
Select the Recipes button in the upper-right corner of the window to display the Selection Profiles tab.
On the Selection Profiles tab, use the Choose Selection Type drop-down to select a previously-created recipe selection profile.
Using the oven example, the selection profile you created was named Reflow.
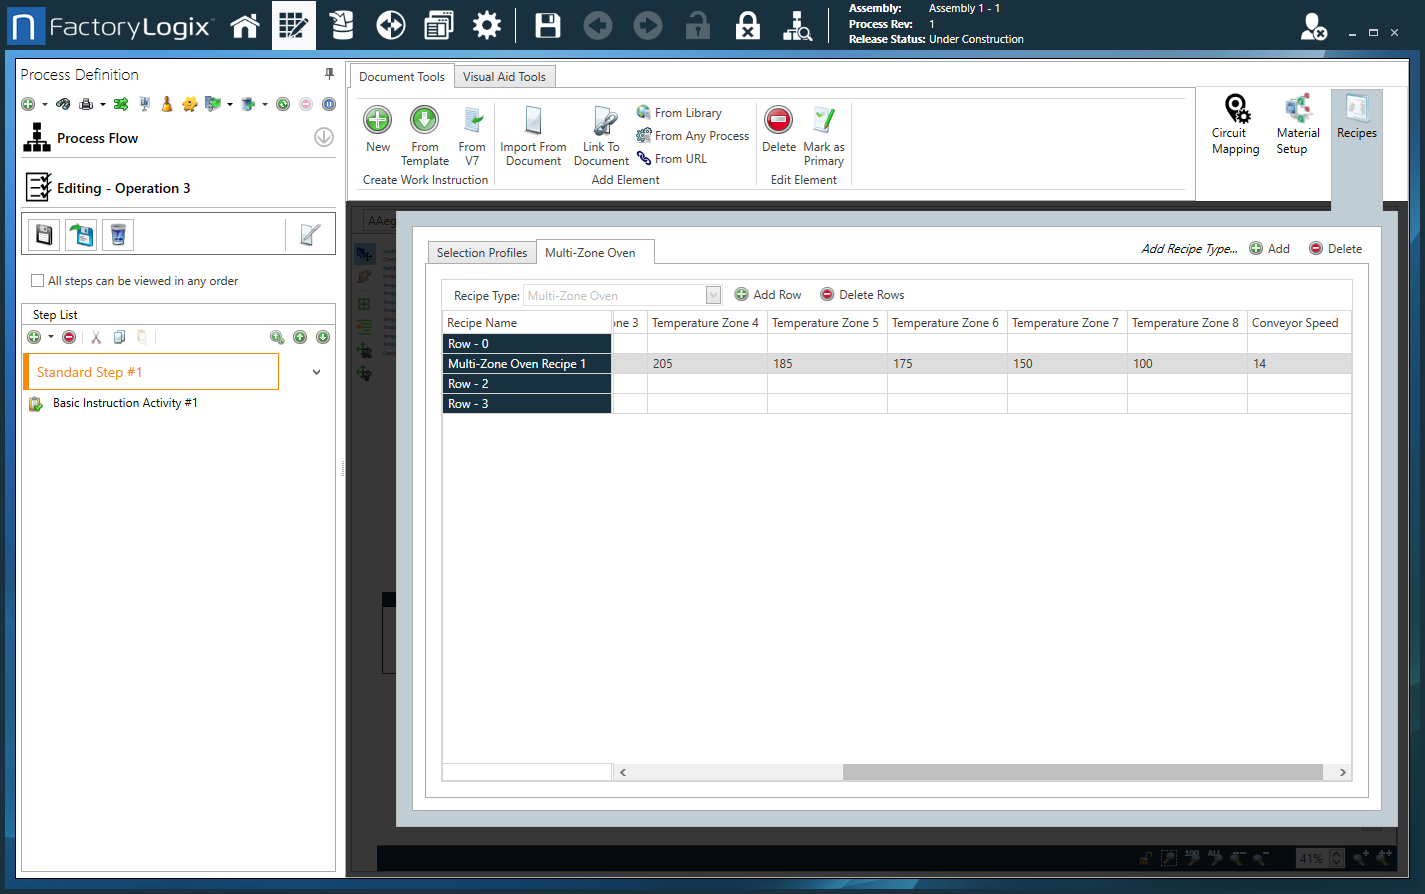
Select Add Recipe Type, then select a previously-created recipe type from the drop down.
Using the oven example, you would select Multi-Zone Oven as the Recipe Type. The parameters you previously specified for the recipe type in Recipe Setup are displayed.
Select the Add Rows button to add a new row.
Use the Location drop-down to select the location where the operation will take place (in the oven example, the location is THE Oven).
Use the other drop-downs to select the Resource Types you previously created related to this selection (in the oven example the Number of Layers, Chemistry, and the recipe which we will rename from Row 1 to Multi-Zone Oven Recipe 1.
Select the AddRecipe Type button on the right side of the window. A new tab displays the Recipe Types you created previously.
Use the Recipe Type drop-down to select a recipe.
In the oven example, the recipe type is named Multi-Zone Oven.
Under Recipe Name, select the recipe.
In the oven example, the recipe name is Multi-Zone Oven Recipe 1.
Enter the values for the recipe.
In the oven example, you would enter a temperature value for each oven zone (Temperature Zone 1, Temperature Zone 2, and so on) and the Conveyor Speed.
After you enter all the values for the recipe, your ready to set up how the recipe will be displayed to operators by adding it to an active work instruction for this operation.
Use recipes in active work instructions
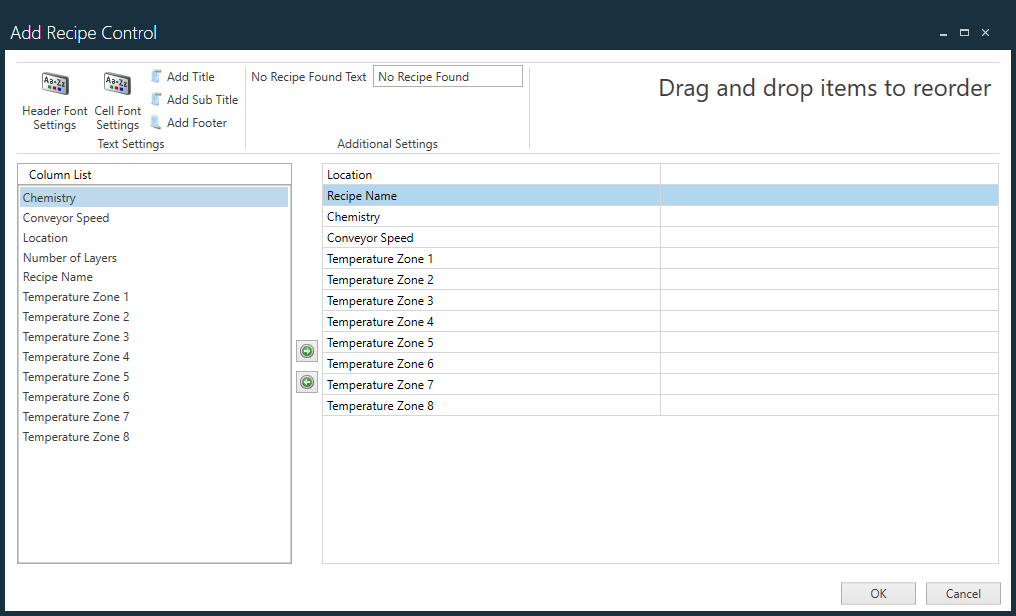
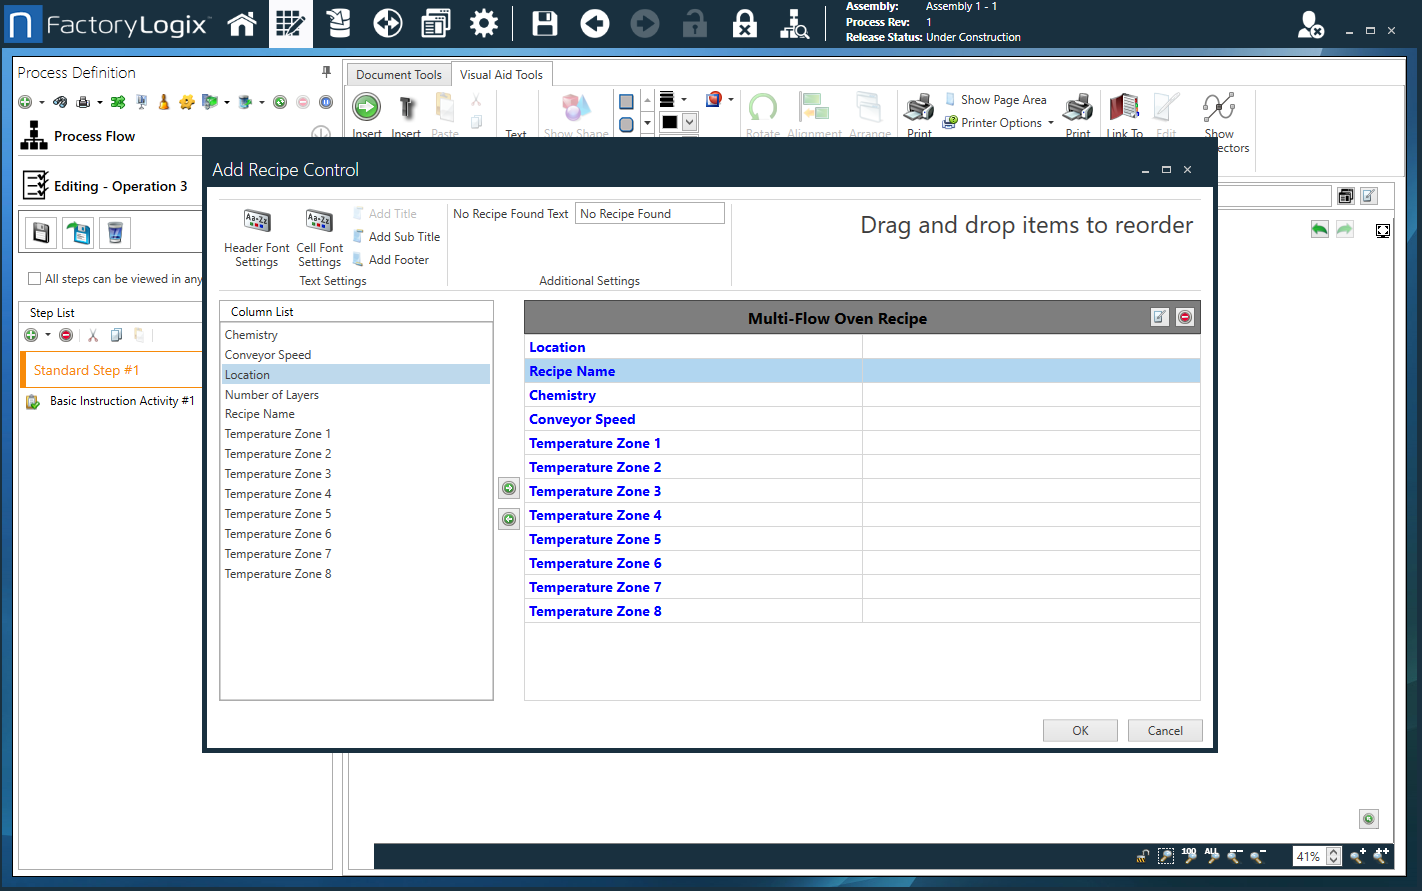
To set up recipe information in an active work instruction in NPI, select the Insert > Insert Recipe Information command on the Visual Aid Tools tab.
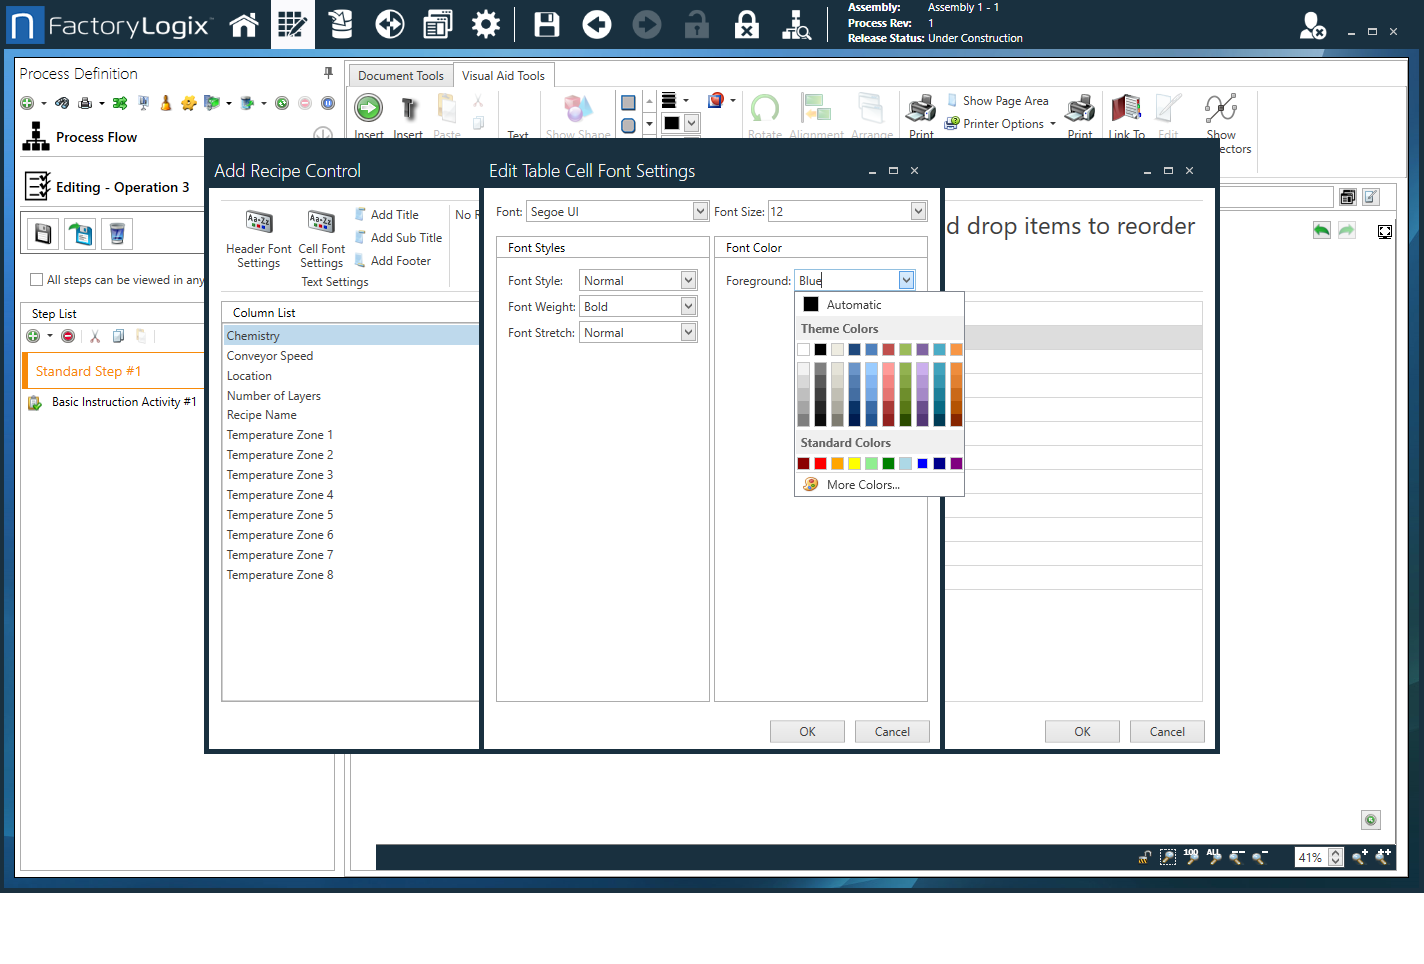
Use the Add Recipe Control dialog options to select and arrange the recipe column data and apply text formatting.
The dialog includes formatting options to add a title, subtitle, and footer to the recipe table and also specify what message operators should see if no recipe file can be located for this operation. You can also drag and drop items if you want to rearrange the order of information presented.
As you make formatting and style changes to the recipe information, you can preview it without exiting the dialog.
After selecting formatting options for the recipe table, select OK.
A recipe table is created with the appropriate recipe values for the operation.
Use recipes in Production
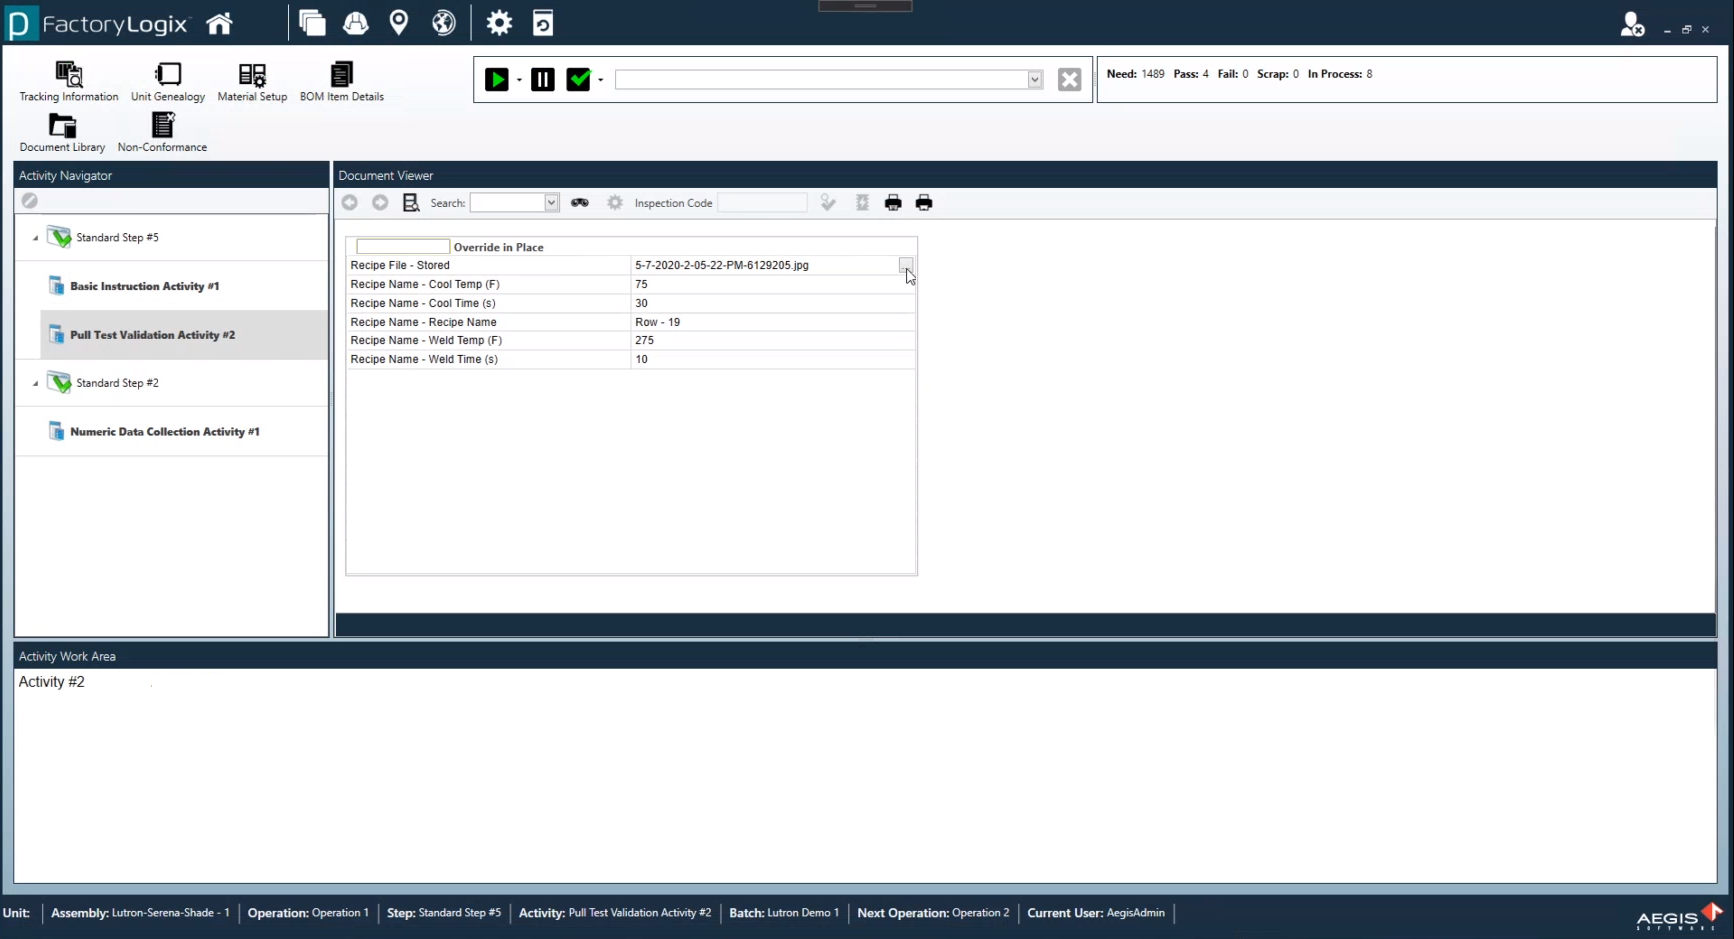
After recipes are set up, what does an operator see in Production?
In Production, the operator will see the required recipe values that were set up in the active work instruction. If a recipe program file is specified, the operator can download the file directly by selecting the ellipses (...) then specifying a location to download the file.


 button in the upper-right corner of the window to display the Selection Profiles tab.