Task List step
A Task List step type is used with multi-part operations to collect multiple pieces of data for each logical part by configuring a list of tasks under a single step in a process definition. (Tasks are essentially FactoryLogix activities.)
Process designers define a Task List step in NPI and execute the individual data capture tasks in the Production client application. As additional tasks are added to the design grid (spreadsheet) in NPI, activity prompts display automatically under the Task List step in the Step List on the left side of the Process Definition window, just like all other activity types.
In the Settings dialog for a Task List step, tasks (activities) are configured in a grid (spreadsheet) format where rows correspond to the activities/tasks being added and columns correspond to the multiple pieces of data being captured for each task.
Create a Task List step
Log into the NPI client application.
Select Process Engineering
 , then select an assembly.
In the Process Definition window, double-click the Process Flow in the tree to open it for editing.
Double-click the operation where you want to add the Task List step to open it for editing.
Select the Add
 button under Step List in the Process tree, then select Task List.
Double-click the Task List step to open the Settings dialog.
Use the following tables to make your selections for the step.
When you're finished making selections for the step, select OK to confirm your choices.
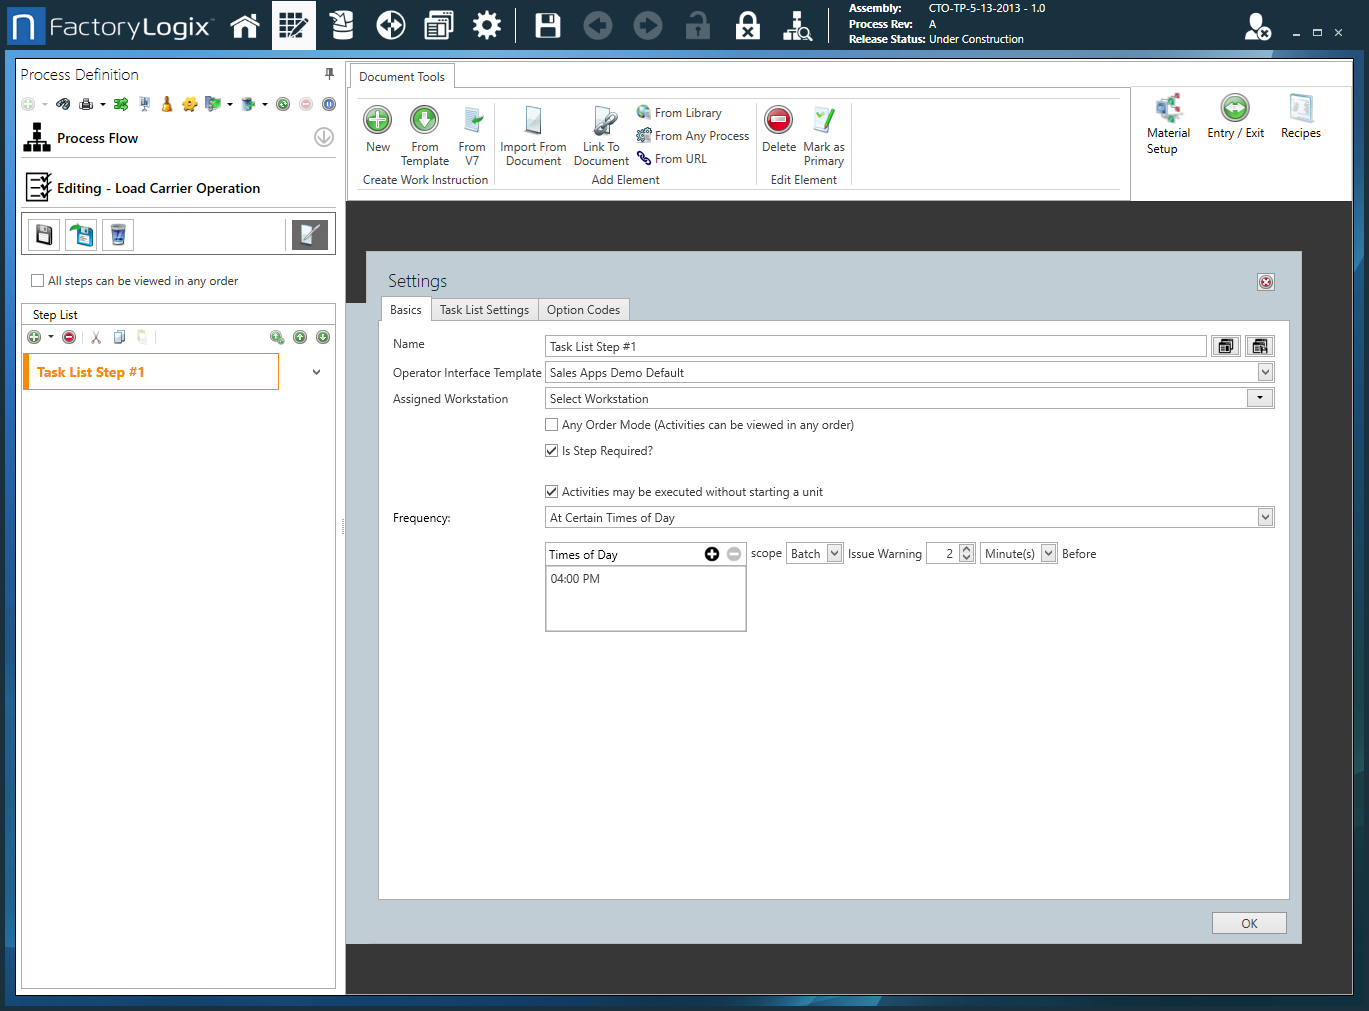
Settings dialog - Basics tab
Option | Description |
Name | The name of the step.
For details about creating and saving step templates, see Create a process, step, or operation template. |
Operator Interface Template | The Operator Interface template to apply to the step. See Operator Interface templates for more information. |
Assigned Workstation | The assigned workstation where the step and activities will be performed by a shop floor operator. See Create a factory and set up factory resources for more information. |
Any Order Mode (Activities can be viewed in any order) | All the activities associated with the step may be viewed in any order. |
Is Step Required? | The step cannot be skipped by a shop floor operator. |
Activities may be executed without starting a unit | Any activities associated with the step may be executed by a shop floor operator without first scanning or entering the UID to start the unit in production. |
Frequency |
|
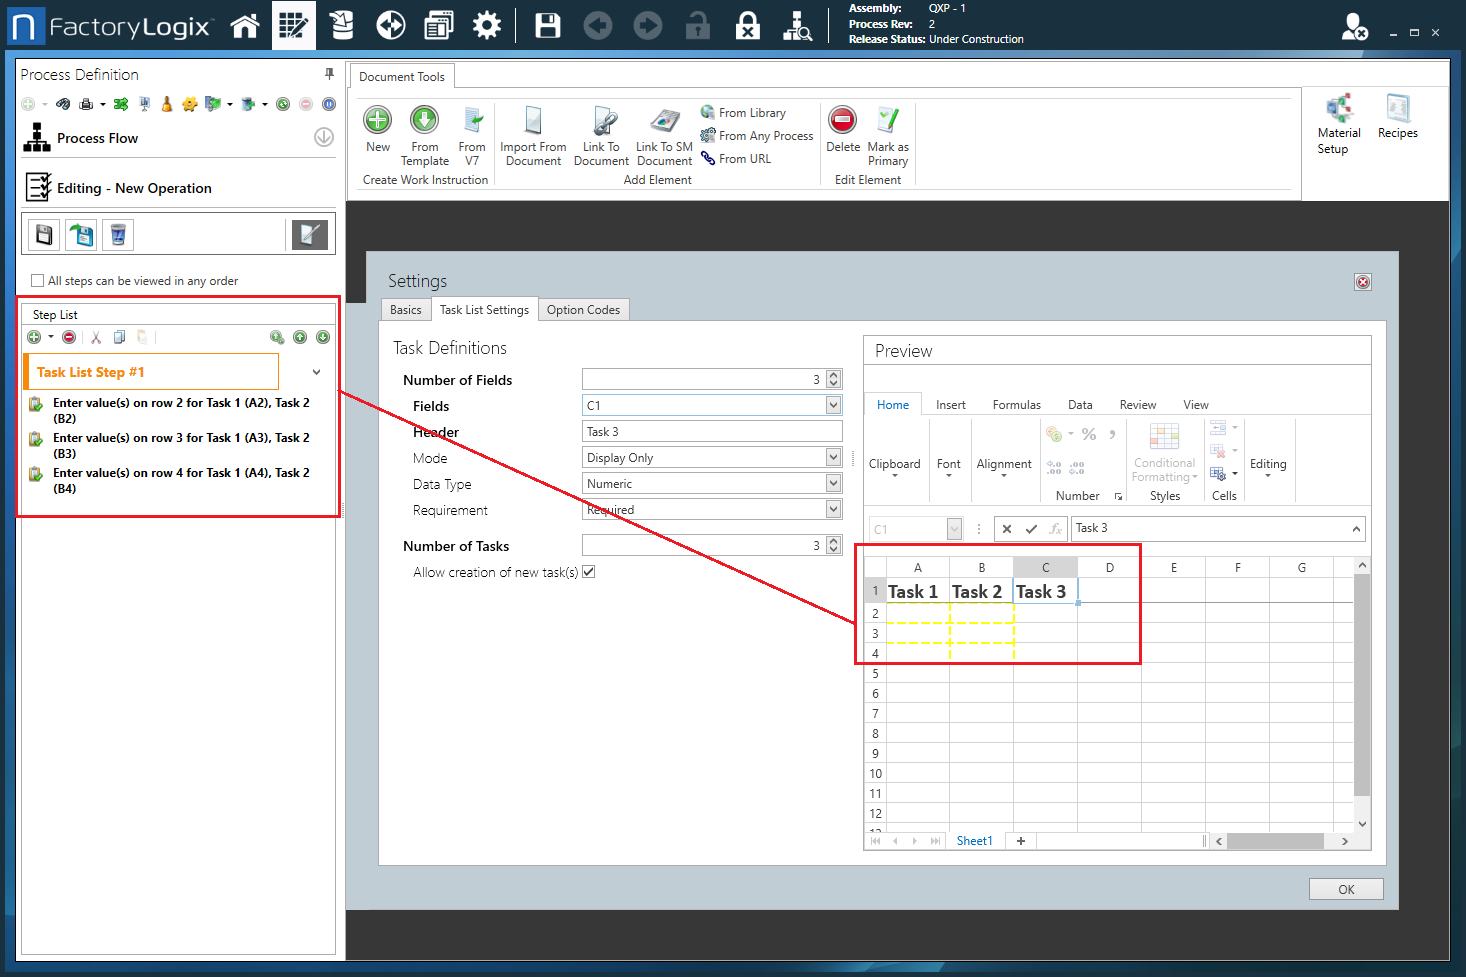
Settings dialog - Task List Settings tab
The Task List Settings tab of the Settings dialog lets you specify the number and type of data fields that will be captured by the added tasks. On the right side of the window, a spreadsheet and controls allow you to enter the number of fields and the number of tasks—rows correspond to the activities/tasks being added and columns correspond to the multiple pieces of data being captured for each task. As you specify the number of fields, the Fields drop-down adjusts automatically to display a list of all fields that can be selected; selecting one of these will establish the context for the remainder of the field-level settings.
Process Flow designers can specify how many tasks a particular step includes and how many pieces of data each task will capture. These settings apply to all units processed through the step in Production. Additionally, Production users can add custom tasks for individual units to accommodate additional work and measurements that arise "on the fly".
When the process flow designer enters values in both the Number of Fields and Number of Tasks fields, a region of the design grid (spreadsheet) is highlighted representing the area where values can be entered. Designers can provide values—or formulas that will calculate values—that will appear when units are processed in the activity task list in Production. Depending on a particular column’s Mode settings, shop floor users either will or won’t be able to override these values.
The Preview pane allows you to format the task list using spreadsheet controls similar to those in Microsoft Excel or other popular spreadsheet applications.
Option | Description |
Task Definitions |
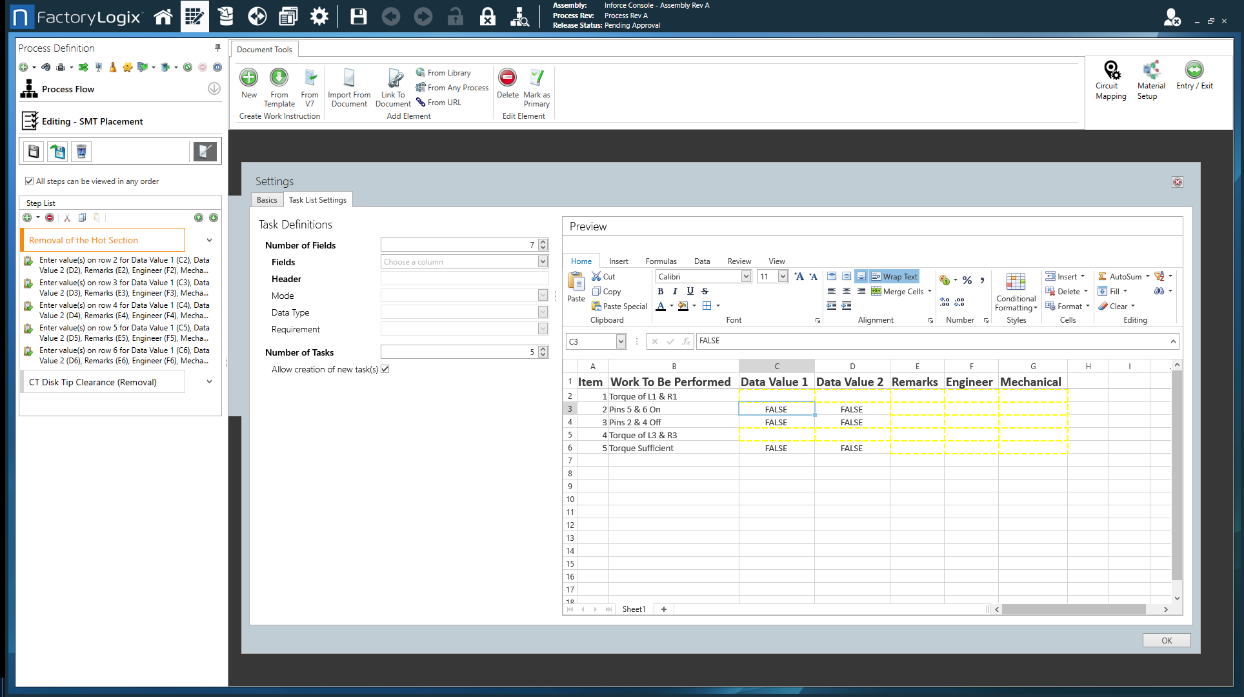
Important Use the options in the Task Definitions area to specify the settings for each task (the item selected in the Fields drop-down).
Note For Display Only fields, the process flow designer can specify values that will be displayed to Production users when the activity is being completed. Default values can also be specified for fields that enable data capture. Standard formulas can be specified for values that will be calculated based on the contents of other task fields. The Home, Insert, Formulas, Data, Review and View tabs in the design grid allow for a variety of formatting and additional spreadsheet manipulation.
Note Stamp type fields (such as Engineer and Mechanical in the following illustration) represent a signoff by one or more people. When Stamp is selected as the field Data Type, additional settings display, allowing control over who can complete the field and whether or not the person entering the field content must have his or her credentials re-verified. This allows for a different set of individuals to be responsible for signing off on values than those who entered the values in the first place. 
|
Preview | The Preview area of the Task List Settings tab is a robust spreadsheet control, much like Microsoft Excel. The various tabs and controls allow you to customize the task list data:
|
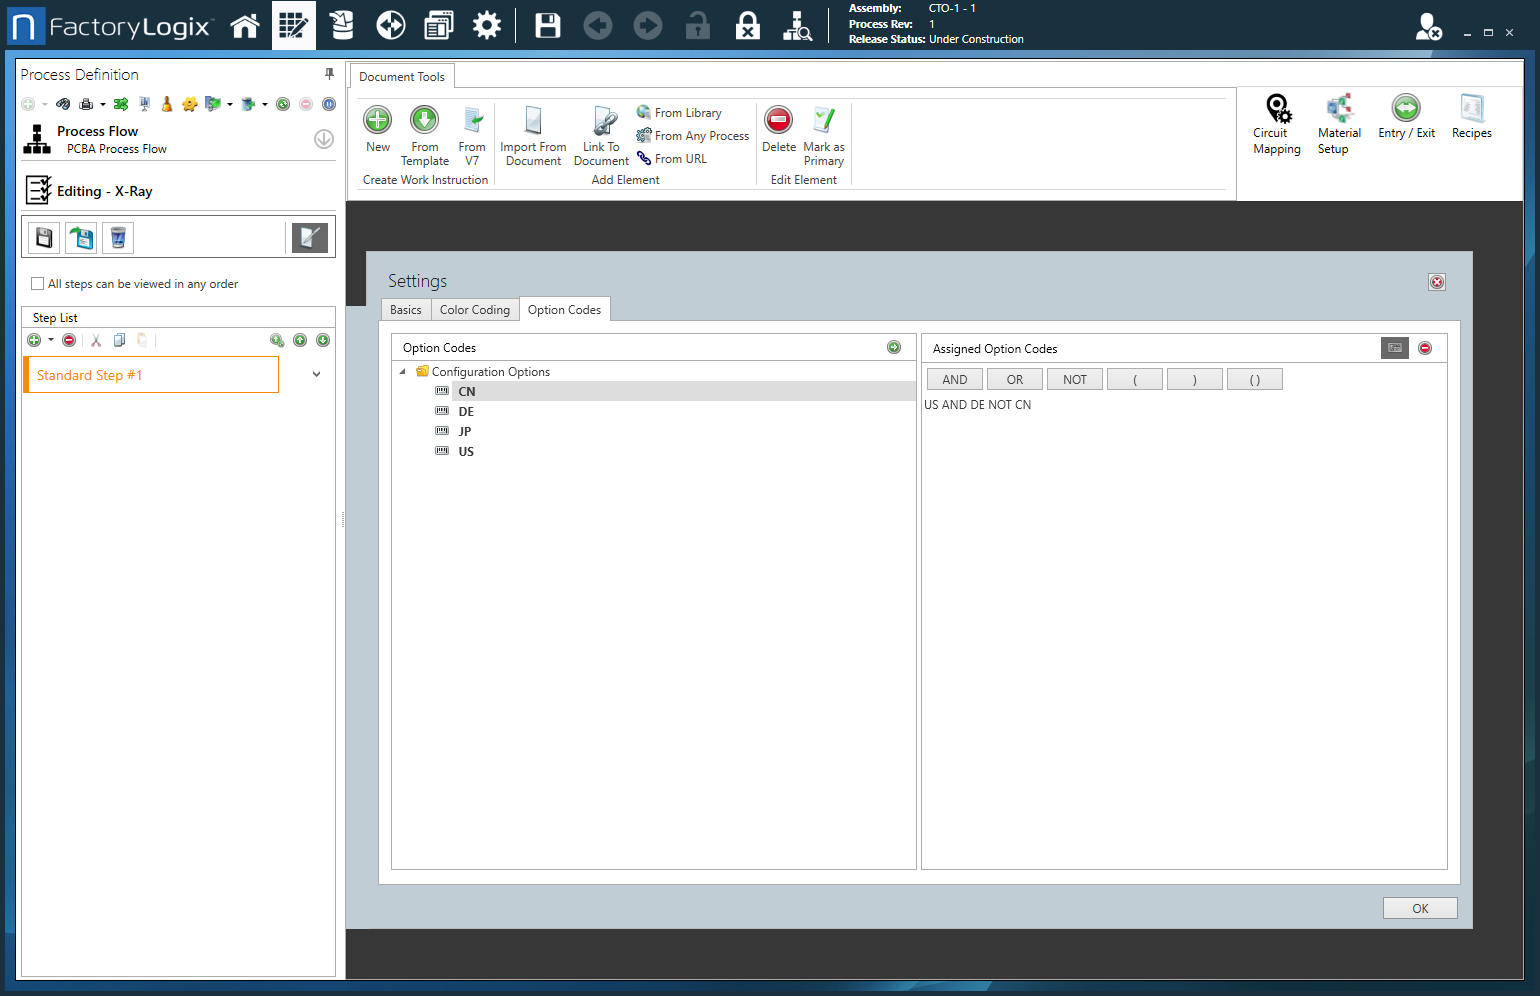
Settings dialog - Option Codes tab
Option | Description |
|---|---|
Option Codes | Displays a list of available option codes. Note Option codes are only used with configurable (CTO) assemblies.
Note For details about option codes, see Option codes for configurable assemblies. |
Assigned Option Codes | Displays the option codes assigned to this step. |
Use Logical Expression | Select the Use Logical Expression 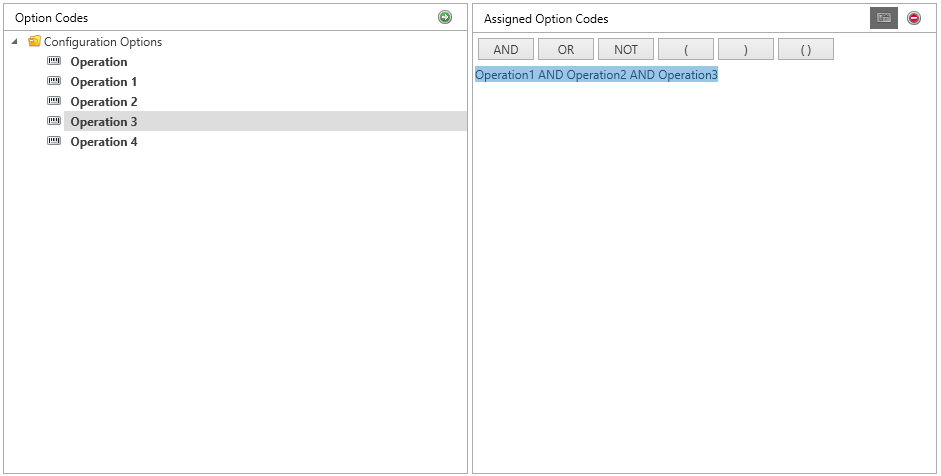 |
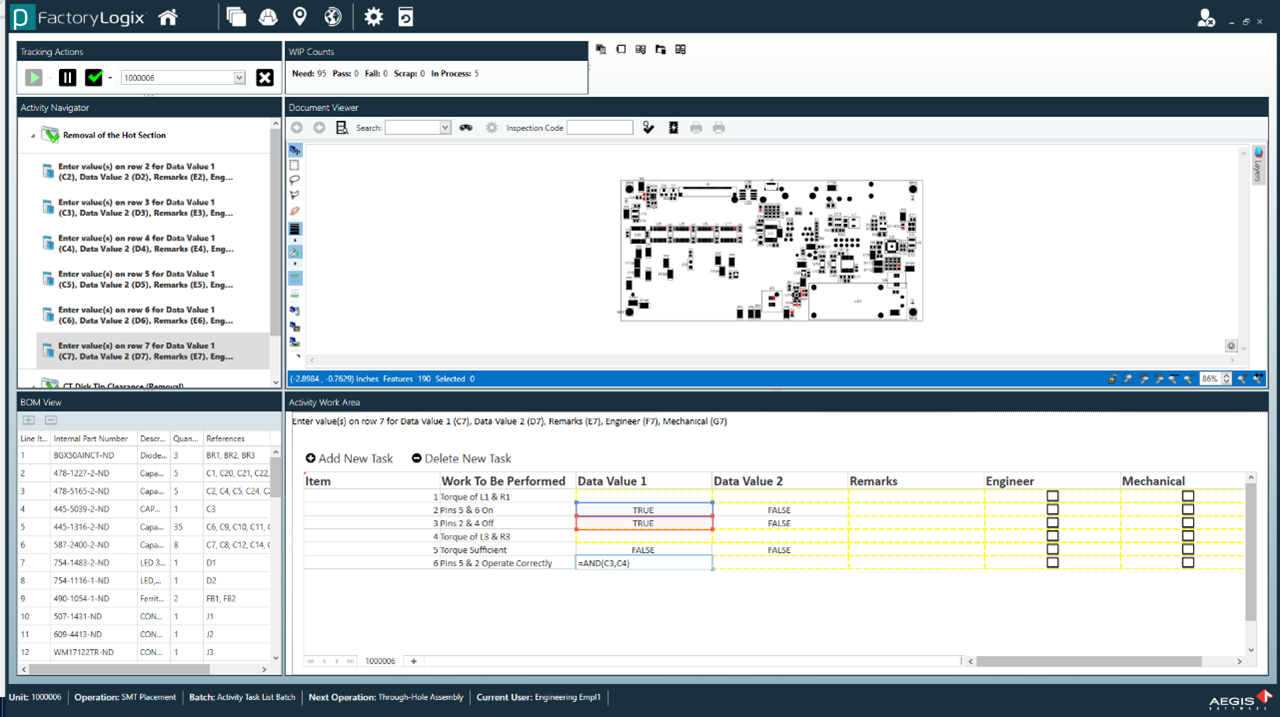
Task List step and activities in Production
When an Task List step is performed in the Production client application, the list of contained tasks (which are essentially FactoryLogix activities) are presented in a grid view. As a shop floor user navigates to the different tasks in the Activity Navigator, the focus moves to the associated item in the list; moving to a new item in the list will move focus to that task in the Activity Navigator. Fields that were defined as Display Only can't be edited and default values entered by the process flow designer for recorded values are displayed, but can be overwritten by the user. Shop floor users don't have to complete the tasks in order and can jump back and forth between them, but if fields were designated as required, the user must provide values for them before the Task List step as a whole can be marked as complete. As soon as all required fields are entered for all tasks, the system marks all the activities in the list as complete and moves the user to the next step in the process flow.
If Allow Creation of New Tasks was selected by the process flow designer, the Add New Task button will be active in Production. Selecting the Add New Task button will cause a new empty row to be added to the task grid. The field constraints defined by the designer (Mode, Data Type, Required, and so on) will apply to fields of this new entry as well, but the new task will only be applicable to the currently processed unit; subsequent units will only have the original task definition unless new tasks are added to these as well. Users can enter values into the new task’s fields, or if the field constraints allow it, formulas that reference other field values in this task or the other tasks.