Skip table of contents

Packout step

A Packout step is typically used as the final operation in a process flow to facilitate the packing of finished products into boxes for shipping. A Packout step includes validation options to ensure all assemblies and sub-assemblies being packaged have passed all required operations and contain no open defect indictments.

Note

For additional information related to packout operations and steps, see Packout.

Create a Packout step

After you create a packout operation, you need to configure a packout step. When you add a Packout step to the operation, it "builds itself" as you define the box to use and the inventory items to be packed in the box.

Note

See Create an Active Work Instruction for more information about active work instructions.

  1.  Log into the NPI client application.

  2. Open a new process definition and create a new operation. (See Add a new operation to a process flow for more information.)

  3. Double-click the operation to open it for editing.

  4. Select the Add Add button button under Step List in the Process tree, then select Packout Step.

  5. Double-click the Packout step to open the Settings dialog.

    Packout step


  6. Use the following tables to make your selections for the step in the Settings dialog.

  7. When you're finished making selections for the step, select OK to confirm your choices. 


    Packout step example

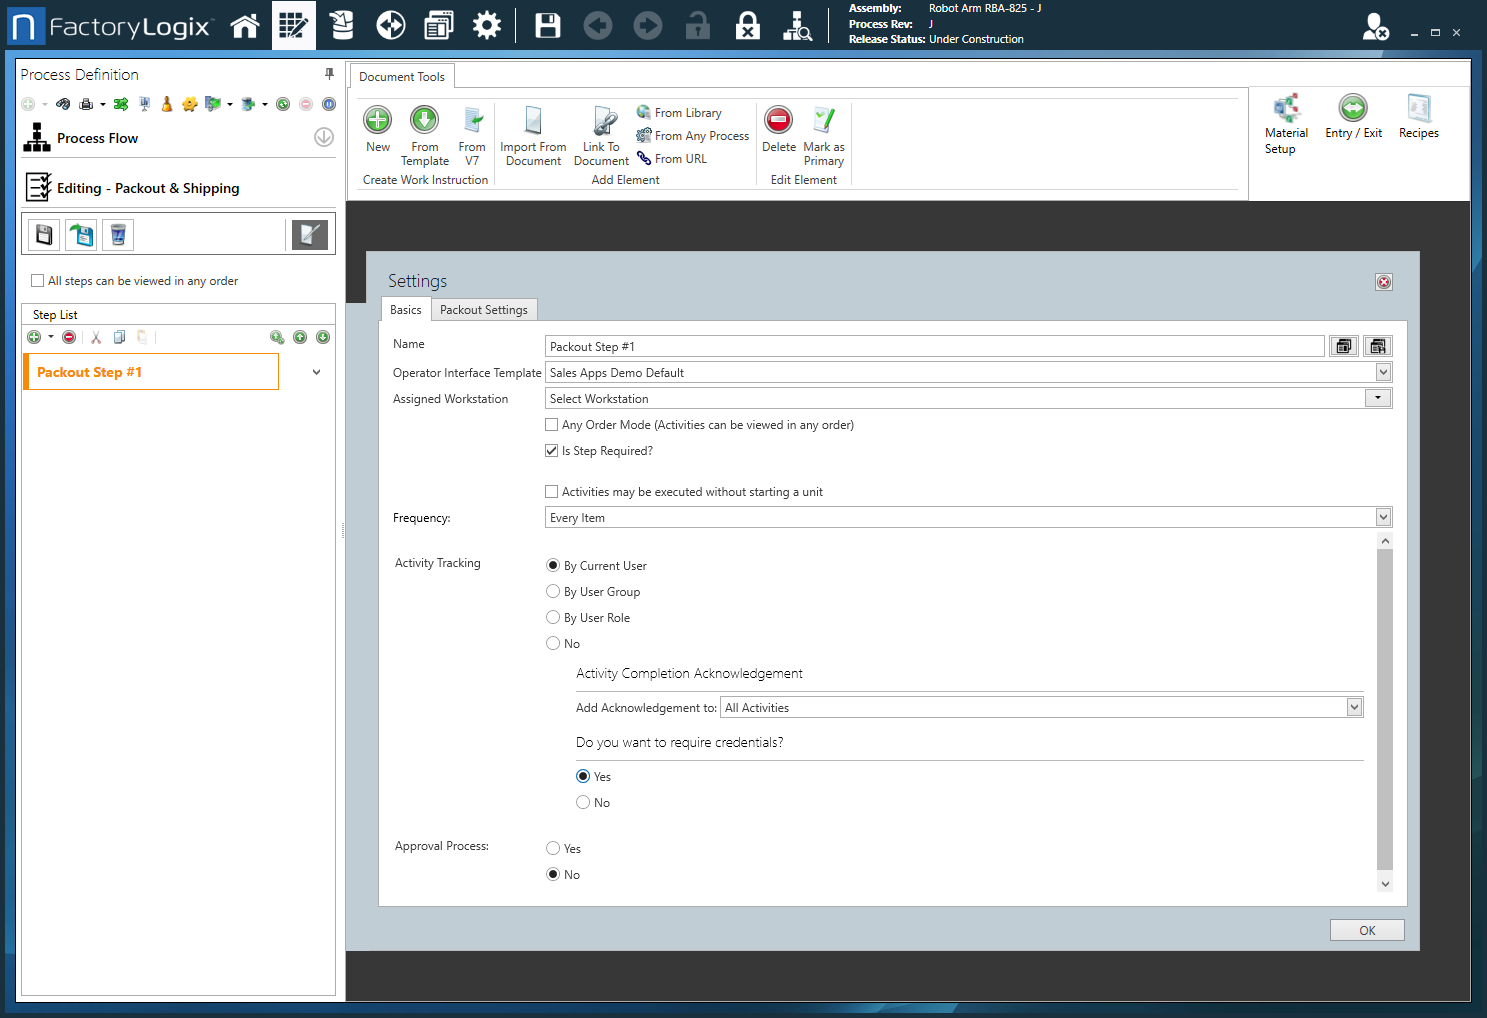
Settings dialog - Basics tab

Option

Description

Name

The name of the step.

  • To apply a step template to the step, select the Apply a Template Apply a Template button button, select a step template, then select OK.

  • To save the step as a step template, select the Save as Template Save as Template button button, enter a name for the template, then select OK.

For details about creating and saving step templates, see Create a process, step, or operation template.

Operator Interface Template

The Operator Interface template to apply to the step. 

See Operator Interface templates for more information.

Assigned Workstation

The assigned workstation where the step and activities will be performed by a shop floor operator.

See Create a factory and set up factory resources for more information.

Any Order Mode (Activities can be viewed in any order)

All the activities associated with the step may be viewed in any order.

Is Step Required?

The step cannot be skipped by a shop floor operator.

Activities may be executed without starting a unit

Any activities associated with the step may be executed by a shop floor operator without first scanning or entering the UID to start the unit in production.

Frequency

  • Frequency - The frequency with which activities associated with the step are displayed and performed. 

    • Every Item - Activities must be performed for every item. 

    • By Item Count - Displays activities for the step every n number of scans. For example, when you select 3, activities will display for every third item, (item 1, item 4, item 7, item 10, and so on).

    • Batch Based - Displays activities using the specified condition:

      • (Select All) - Displays activities for the first and last items in the batch.

      • Start of Batch - Displays activities for the first item in the batch.

      • End of Batch - Displays activities for the last item in the batch.

    • Time Interval - Activities for the step must be performed using the specified conditions. For example, 1 product every 2 minutes for the current batch. 

    • At Certain Times of Day - Displays activities for the step at specific times during the day, for example when periodic maintenance is needed to keep a workstation or machine running smoothly.

    • By % of Total - Displays activities (even distribution) for the step each time the specified percentage of the total batch is reached. For example, a value of 10 percent in a 50-piece batch will display the specified step and activities every tenth assembly (10 percent of 50 is 5 over the course of 50 assemblies). This condition might be useful for periodic inspection of items in a batch.

    • Operation Session Based - Displays activities for the step each time an operator logs in to begin a new session.

Activity Completion Acknowledgement

Add Acknowledgement to:  The shop floor operator must acknowledge completion of All Activities, the First Activity, or the Last Activity associated with the step.

Do you want to require credentials?

  • Yes - The shop floor operator is prompted to supply appropriate credentials before completing the step.

  • No - The shop floor operator isn't required to provide credentials before completing the step. 

Approval Process

  • Yes - An approval will be required for the specified activities before the step can be completed.

    • Select an approval process from the Approval Process drop-down.

    • Select the activities that the approval will be required for: First ActivityLast Activity, or All Activities.

  • No - The shop floor operator won't be required to obtain an approval before completing the step and its activities. 

Settings dialog - Packout Settings tab

The Packout Settings tab allows you to select inventory items to be packed, specify a box type for packing, select a label template to use for packing, include a parts list if desired, and specify other packout-related options.
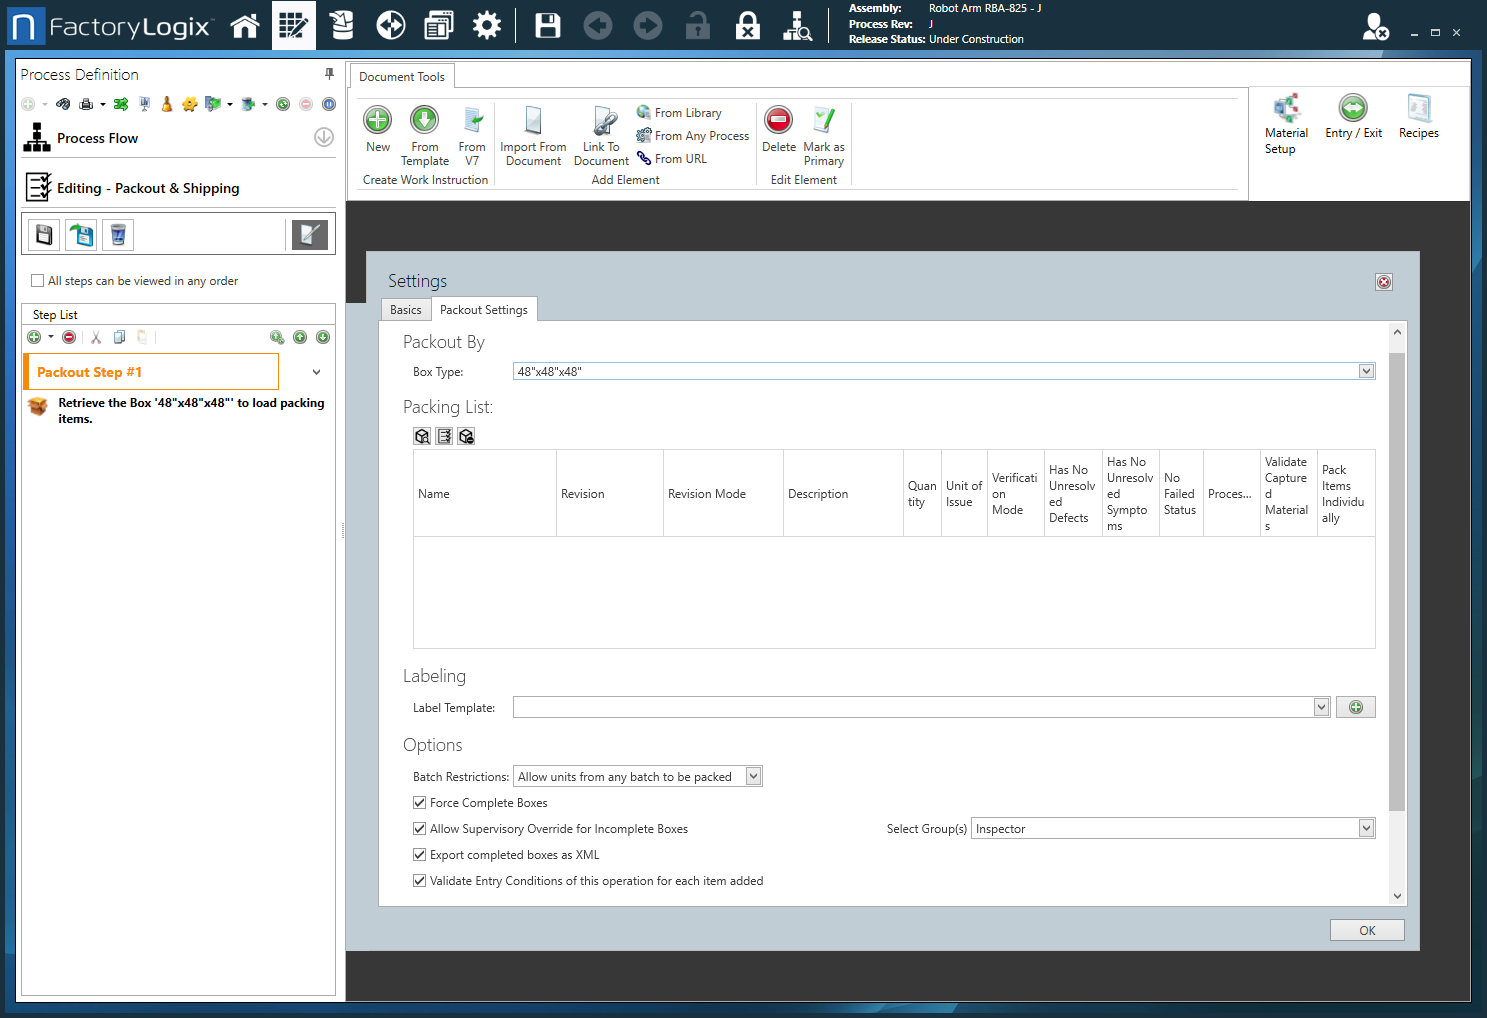
Packout Settings tab

Option

Description

Box Type

Use the Box Type drop-down under Packout By to select the desired box type for packing items. (See Create a box and add it to inventory for more information.)
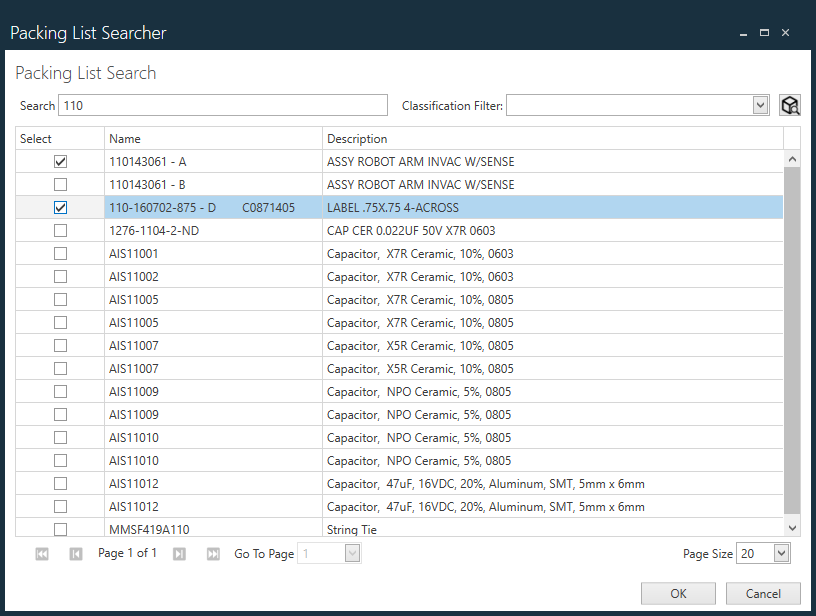
Add Packing Items Add Packing Items button

Under Packing List, select the Add Packing Items Add Packing Items button button to search for inventory items to be packed. Use the filtering options in the Packing List Searcher dialog, then select the Search button Add Packing Items button on the right side of the dialog.

  • Search - Enter a search string to search for inventory items to be packed.

  • Classification Filter - Select a filter for searching: (Select All), Assembly, Part, or Box.

    Select the items to be packed in the Select column, then select OK to select the desired items to be packed.

    Packing List Searcher dialog

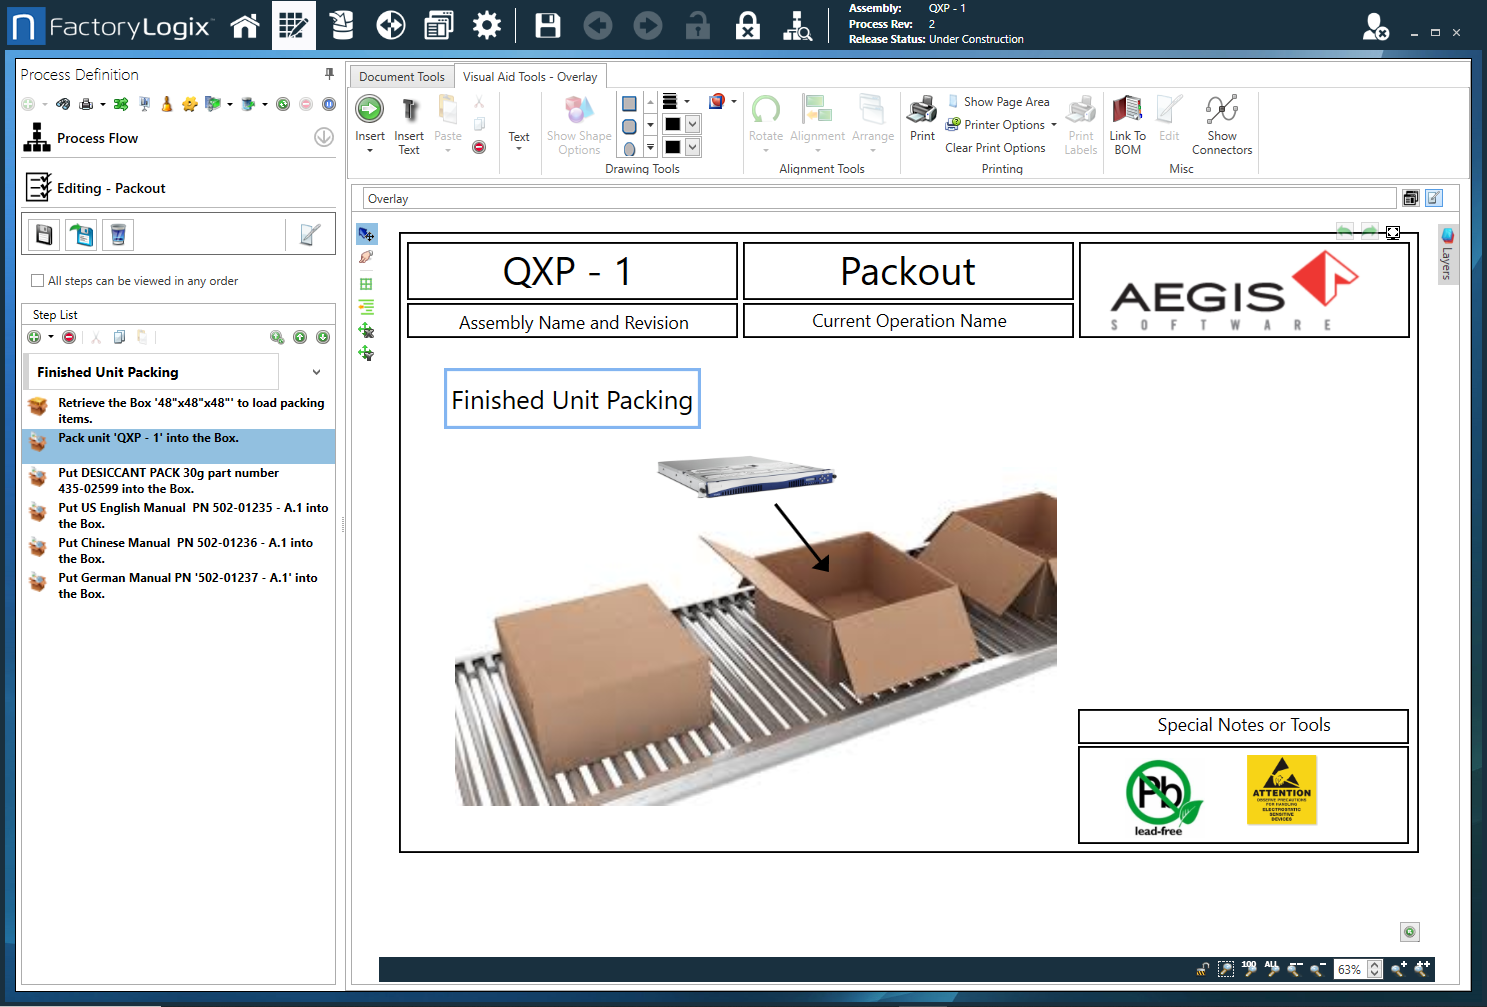
Note

Notice that two new activities in the Step List on the left side of the Process Definition window are created automatically: one to instruct the operator to retrieve the appropriate Box type from inventory, the other detailing the assembly to be packed in the box.

As additional inventory items are added to the packing list, new activities are generated automatically.

Tip

To add parts list items to a packing list dynamically based on the batch-level pick list items imported via an xTend FLX-XTD-JOB-01.xml file, see Add parts list items to a packing list.
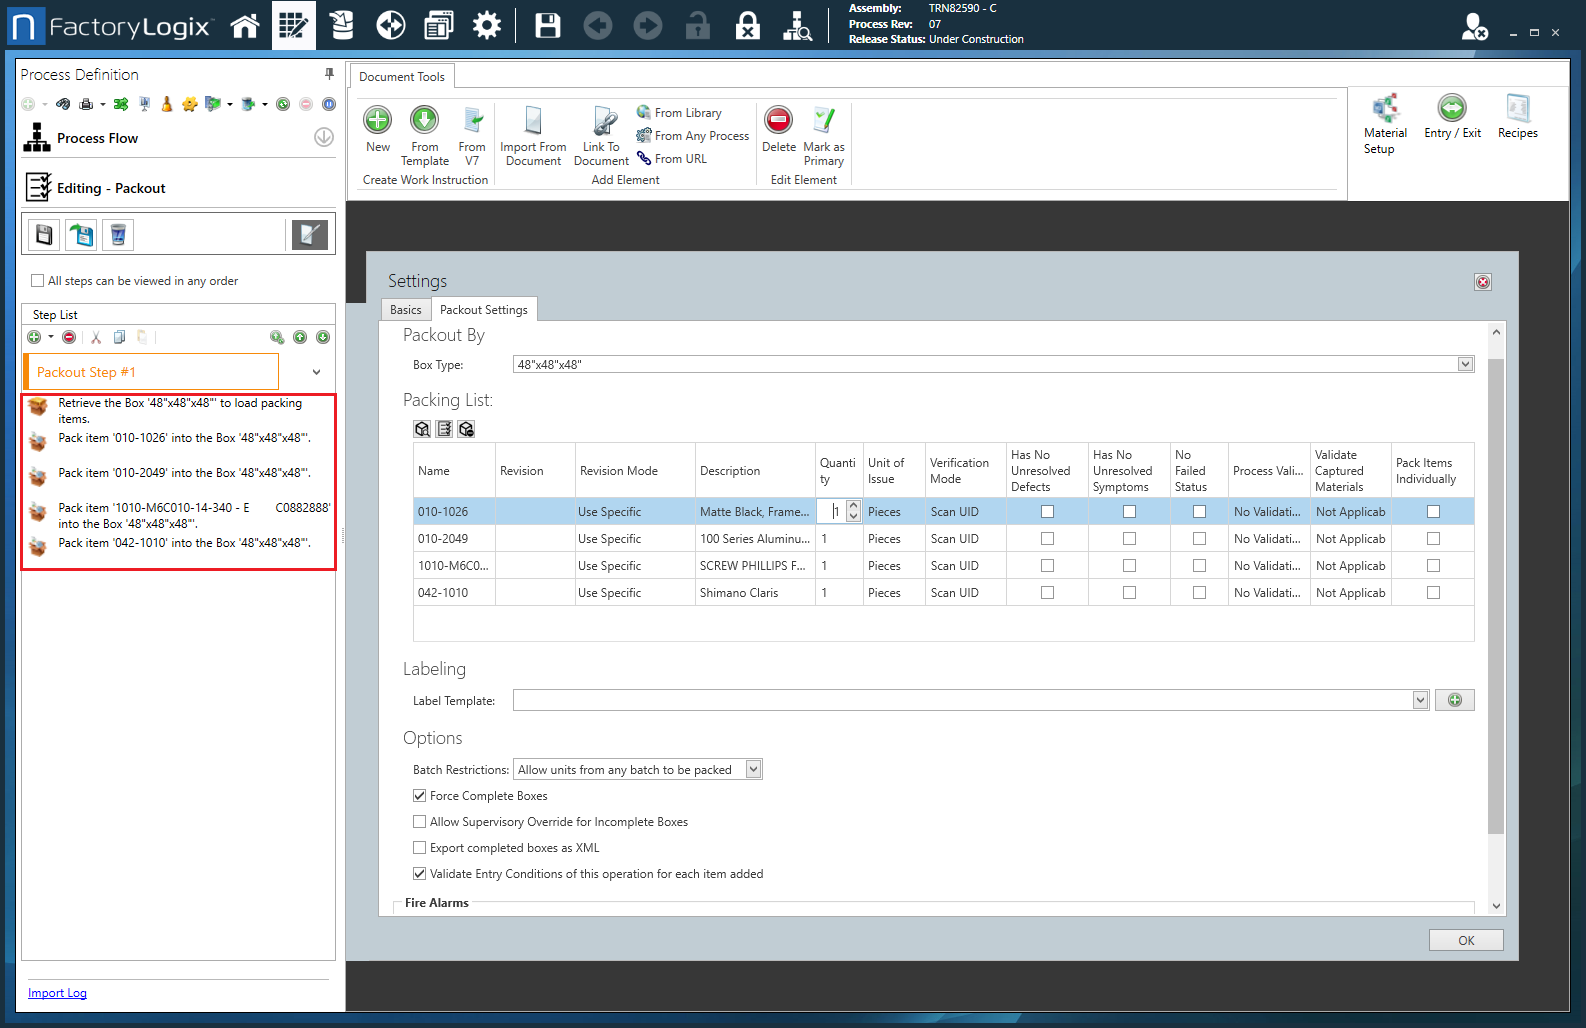
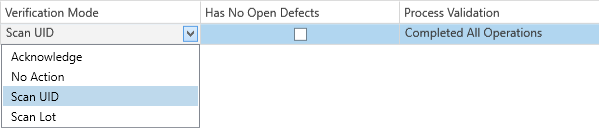
Packout step - auto activities added

  • Include Parts List - Use this button to include the parts list associated with the items to be packed in the packing list.

  • Remove Packing Items Remove Packing Items button - Use this button to remove a selected item from the packing list.

Packing List

On the Packout Settings tab under Packing List, there are some columns of data that you can adjust as needed for your packing list. (Some columns such as NameDescription, and Unit of Issue are informational only and cannot be changed.)

  • Revision - Select the valid revisions if several revisions of the selected assembly exist.

  • Revision Mode -Specifies the revision mode of the selected items to use: Use LatestUse AnyUse SpecificUse Specific or NewerUse Specific or Older.

  • Quantity - Specifies the quantity to be packed in this box.

  • Verification Mode Specifies what the factory floor operator must enter or scan in order to specify the item being packed. There are four possible modes:

    • Acknowledge - Presents the operator with a check box to acknowledge that he or she followed the instruction and packed the appropriate item in the box. This is most useful for less critical items like a quick-start guide or warranty sheet.

    • No Action - Presents the instruction to the operator with no need to acknowledge.

    • Scan UID - Turns on all validation options in the remaining columns of the dialog: that the assembly selected and scanned contains no open defects and has completed all of the prescribed assembly operations as defined in the Process Flow. This option requires that the assembly was built entirely in FactoryLogix.

Note

When Any Order packing mode is selected, the Verification Mode for all packing items is fixed to Scan UID.

  • Scan Lot - Allows the operator to scan or enter any alphanumeric data as the lot ID for the assembly or item being packed with no validation. The data entered will be presented in the overall comprehensive traceability information.

    Packout settings


  • Has No Unresolved Symptoms - When selected, checks for the presence of any unresolved (open) symptoms associated with the item being packed.

Note

In Production, when packout is being performed and the Has No Unresolved Symptoms validation check fails, the operator will see an error message.

  • Has No Unresolved Defects - When selected, checks for the presence of any unresolved (open) defects associated with the item being packed.

Note

In Production, when packout is being performed and the Has No Unresolved Defects validation check fails, the operator will see an error message.

  • Pack Items Individually - When selected, checks for each item you want to be packed individually/separately.

Label Template

Use the drop-down to select the desired shipping label for the box (this requires that the desired label template is already defined in the Labels area of NPI).

Use the Add Add button button to display the Create Label Template dialog where you can create and save a new shipping label template. (See Create or duplicate printed label templates for details.)

Options

  • Force Complete Boxes - When selected, ensures that the correct box quantity is filled before an operator can finish the box in Production.

Allow Supervisory Override for Incomplete Boxes - When selected, supervisor approval is required for any incomplete boxes.

  • Batch Restrictions - Restricts packout items to:

    • Any batch

    • Only units from this process revision

    • Only units from the same production batch

    • Only units from the same order

  • Select Group(s) - Allows you to select one or more groups who will approve the packout (Inspectors and Supervisors, for example).

  • Export Completed Boxes as XML - When selected, exports an XML file of the contents of the completed boxes. (You can configure the location of the file in Settings.)

  • Validate Entry Conditions of this operation for each item added - validates that all entry conditions for the Packout operation have been met for each item in the packing list.

  • Fire Alarms - If you use the Analytics client application, you can select alarms and generate reports for packout. When you select the Print check box, the selected report will be printed. See Use alarms for packout operations for more information.

    • On Box Completed - Executes the selected alarm reaction template for the entire box contents when a packing box is completed.

    • On Item Added - Executes the selected alarm reaction template when each item is added to the packing box.

    • Print -  When you select the Print check box for the On Box Completed or the On Item Added alarm reaction, any reports associated with the alarm reaction are generated on the client workstation (that is, the workstation executing the Packout operation in Production).

Note

Only items of the Report type are returned in the selected output type format. The returned reports are printed on a local printer automatically. The printer can also be selected in the Activity Work Area in Production, so if multiple printers are installed, the shop floor operator can select a specific printer to use. 

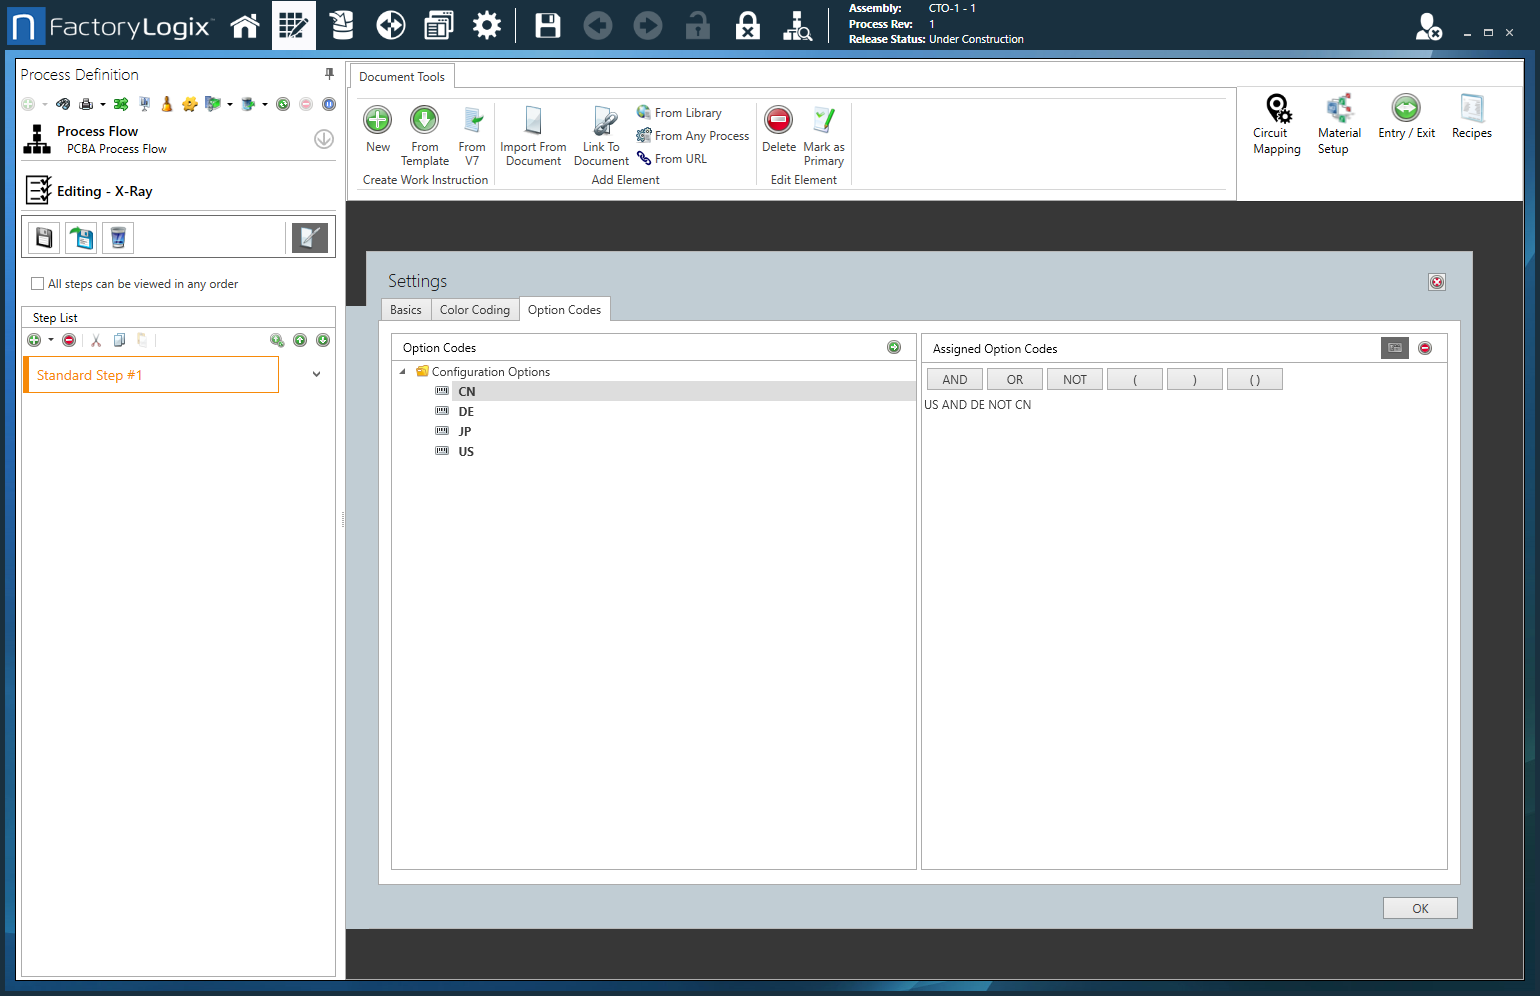
Settings dialog - Option Codes tab

Option

Description

Option Codes

Displays a list of available option codes.

Note

Option codes are only used with configurable (CTO) assemblies.

  • Use the Apply Option Codes Apply Option Codes button button to move selected option code(s) to the Assigned Option Codes column.

  • Use the Remove Option Codes Remove Option Codes button button on the right side of the window to move selected assigned option code(s) back to the Option Codes list.

    Option Code Logical Expressions


Note

For details about option codes, see Option codes for configurable assemblies.

Assigned Option Codes

Displays the option codes assigned to this step.

Use Logical Expression

Select the Use Logical ExpressionUse Logical Expression buttonbutton on the right side of the dialog to define option codes for a step in the form of a logical expression (comprised of available option codes plus the logical operators: AND, OR, and NOT, and brackets to identify precedence).

Logical expressions for option codes

JavaScript errors detected

Please note, these errors can depend on your browser setup.

If this problem persists, please contact our support.